कस्टम फ़ील्ड्स के लिए कोड एक्सपोर्ट करने हेतु UI का उपयोग
कभी-कभी, जब आप किसी custom module से content type निकालते हैं, तो आप उस content type से संबंधित फ़ील्ड्स भी जोड़ सकते हैं। फ़ील्ड्स को स्वचालित रूप से बनाने की क्षमता आपको कई साइटों पर uninstall और reinstall करने देती है, बिना अतिरिक्त फ़ील्ड्स छोड़े और यह सुनिश्चित करती है कि आप उन्हें जोड़ना न भूलें। इन फ़ील्ड्स को अपने कोडबेस में जोड़ने के दो तरीके हैं, जिन्हें हम देखेंगे।
पूर्वापेक्षाएँ
- Drupal 8.0.x इंस्टॉल होना चाहिए।
- एक custom module होना चाहिए (इस उदाहरण में इस्तेमाल किया गया module नाम foobar है)।
- मॉड्यूल में एक custom content type होना चाहिए (कृपया parent page पर दिए गए निर्देशों का पालन करें। Content type का नाम होगा "Car Brand")।
हमारे content type में अतिरिक्त फ़ील्ड्स जोड़ना
इस step को करने के दो तरीके हैं। आप UI का उपयोग करके फ़ील्ड्स बना सकते हैं और कॉन्फ़िगरेशन को फाइलों में export कर सकते हैं, या आप फाइलों को सीधे स्वयं लिख सकते हैं। मुझे पहला तरीका पसंद है, ताकि यह सुनिश्चित हो सके कि आप कुछ भी न चूकें, हालांकि फ़ील्ड्स "field_" से शुरू होकर export होते हैं, न कि "foobar_car_brand_" से, ताकि उन्हें हमारे custom content type से जोड़ा जा सके। इस पेज पर हम UI का उपयोग करके फ़ील्ड्स बनाने और code export करने को देखेंगे, जिसे आपके custom module में इस्तेमाल किया जाएगा।
फ़ील्ड्स बनाने के लिए UI का उपयोग
जैसा कि पहले बताया गया था, यह तरीका उन उपयोगकर्ताओं के लिए थोड़ा बेहतर है, जिन्हें Drupal द्वारा content type में फ़ील्ड जोड़ने की आवश्यकताओं से अधिक परिचित नहीं है।
Custom content type को enable करना
यदि आपने अभी तक parent page के अंत में foobar module enable नहीं किया है, तो इसे अभी करें। यदि आप अब "Add content" पेज पर जाते हैं, तो आप देखेंगे कि आप "Car Brand" content type का नया node बना सकते हैं।
/admin/structure/types/manage/car_brand/fields
अब जब आपका module enable है, तो आप अपने content type के field management सेक्शन में जा सकते हैं। जो भी फ़ील्ड्स आप चाहें जोड़ें। बस यह सुनिश्चित करें कि जिन फ़ील्ड्स को आप जोड़ते हैं, उनमें से एक "Brand Information" (field_brand_information) नाम का फ़ील्ड हो, जिसका प्रकार "Text (formatted, long, with summary)" हो, और "Body" फ़ील्ड को हटा दें। बाकी सबको default पर छोड़ दें।
फ़ील्ड कॉन्फ़िगरेशन export करने के लिए UI का उपयोग /admin/config/development/configuration/single/export
जैसे ही आप अपने फ़ील्ड्स जोड़ लें, कॉन्फ़िगरेशन सिंक्रोनाइज़ेशन पेज पर जाएँ। ऊपर तीन tabs हैं। इनमें से "Export" चुनें। फिर इन tabs के नीचे "Single item" चुनें।
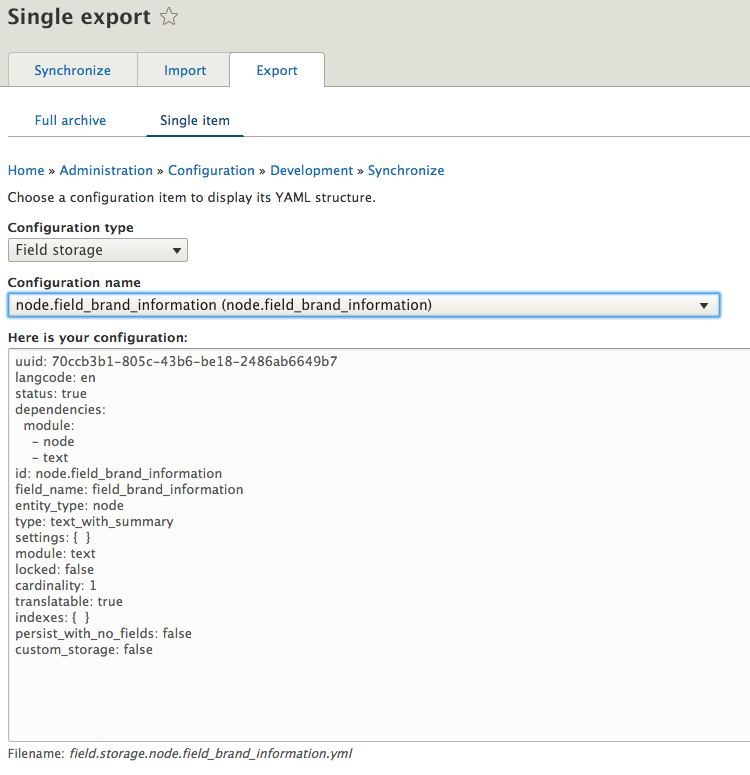
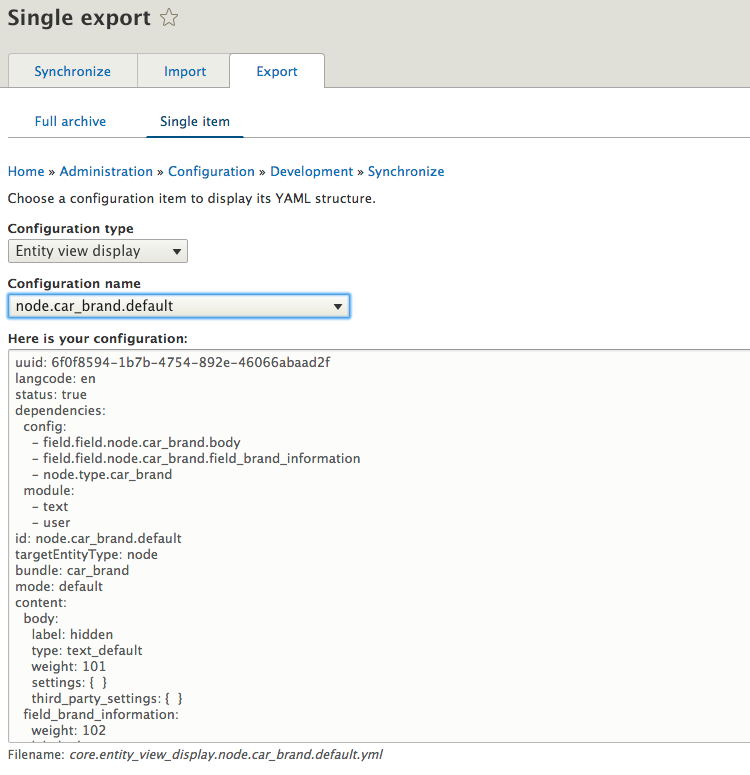
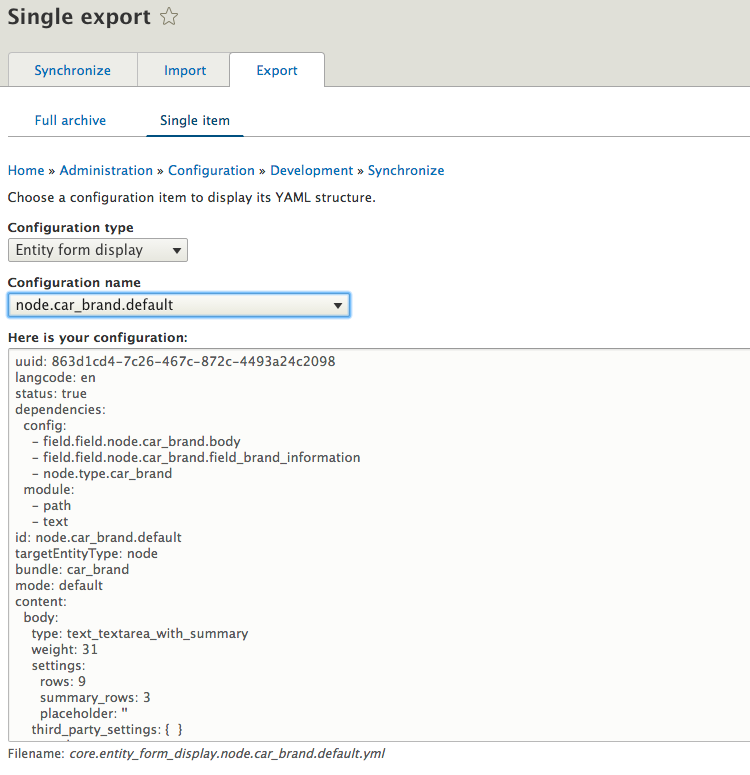
Export configuration प्राप्त करना
नीचे चार screenshots दिए गए हैं, जो दिखाते हैं कि "field_brand_information" फ़ील्ड के लिए किन items को export करना ज़रूरी है।
- Field Storage
- Field
- Entity View Display
- Entity Form Display
Configuration code block के नीचे आपको उस फाइल का नाम दिखाई देगा, जिसे आपको अपने custom module में बनाना होगा। Configuration code में से सब कुछ उस फाइल में कॉपी करें, सिवाय उस पहली लाइन के, जो "uuid:" से शुरू होती है।
नोट: यदि आपने कोई अतिरिक्त फ़ील्ड्स जोड़े हैं, तो आपको प्रत्येक के लिए field और field storage export करना होगा। यही बात लागू होती है अगर आपने teaser जैसे कई displays बनाए हैं। इस उदाहरण में हम केवल default display दिखा रहे हैं।
modules/custom/foobar/config/install/field.storage.node.field_brand_information.yml
modules/custom/foobar/config/install/field.field.node.car_brand.field_brand_information.yml

modules/custom/foobar/config/install/core.entity_view_display.node.car_brand.default.yml
modules/custom/foobar/config/install/core.entity_form_display.node.car_brand.default.yml
foobar module को uninstall और reinstall करें
अब जब आपके सभी field configurations आपके codebase में हैं, तो foobar module को uninstall करने का समय है। Module uninstall करने के बाद, module को फिर से enable करें और देखें कि क्या यह आपके custom फ़ील्ड्स जोड़ता है। यदि आप अब "Add content" पेज पर जाते हैं, तो आप देखेंगे कि आप "Car Brand" content type का नया node बना सकते हैं, और इसमें हमारा नया फ़ील्ड "Brand Information" और कोई भी अन्य फ़ील्ड शामिल होगा, जो आपने बनाए थे।