Creating new EPT modules
Easiest way to create a new EPT module is Drush command (for Drush 12+). To use this command, you need to enable EPT Core Starterkit module:
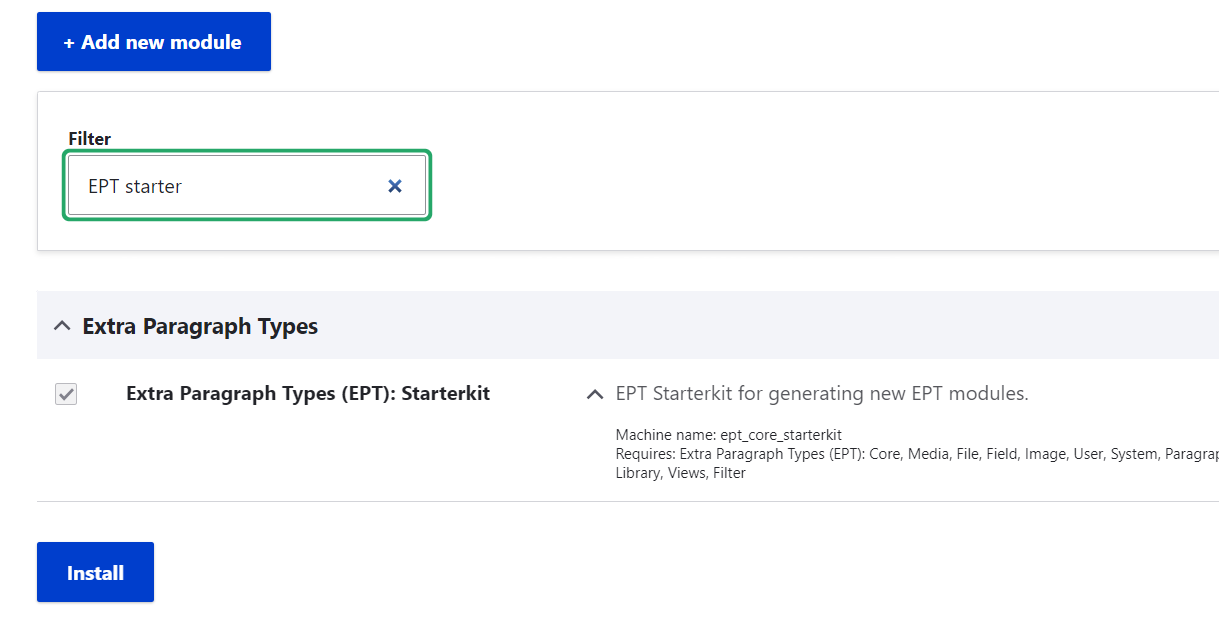
After that generator EPT modules will be available:
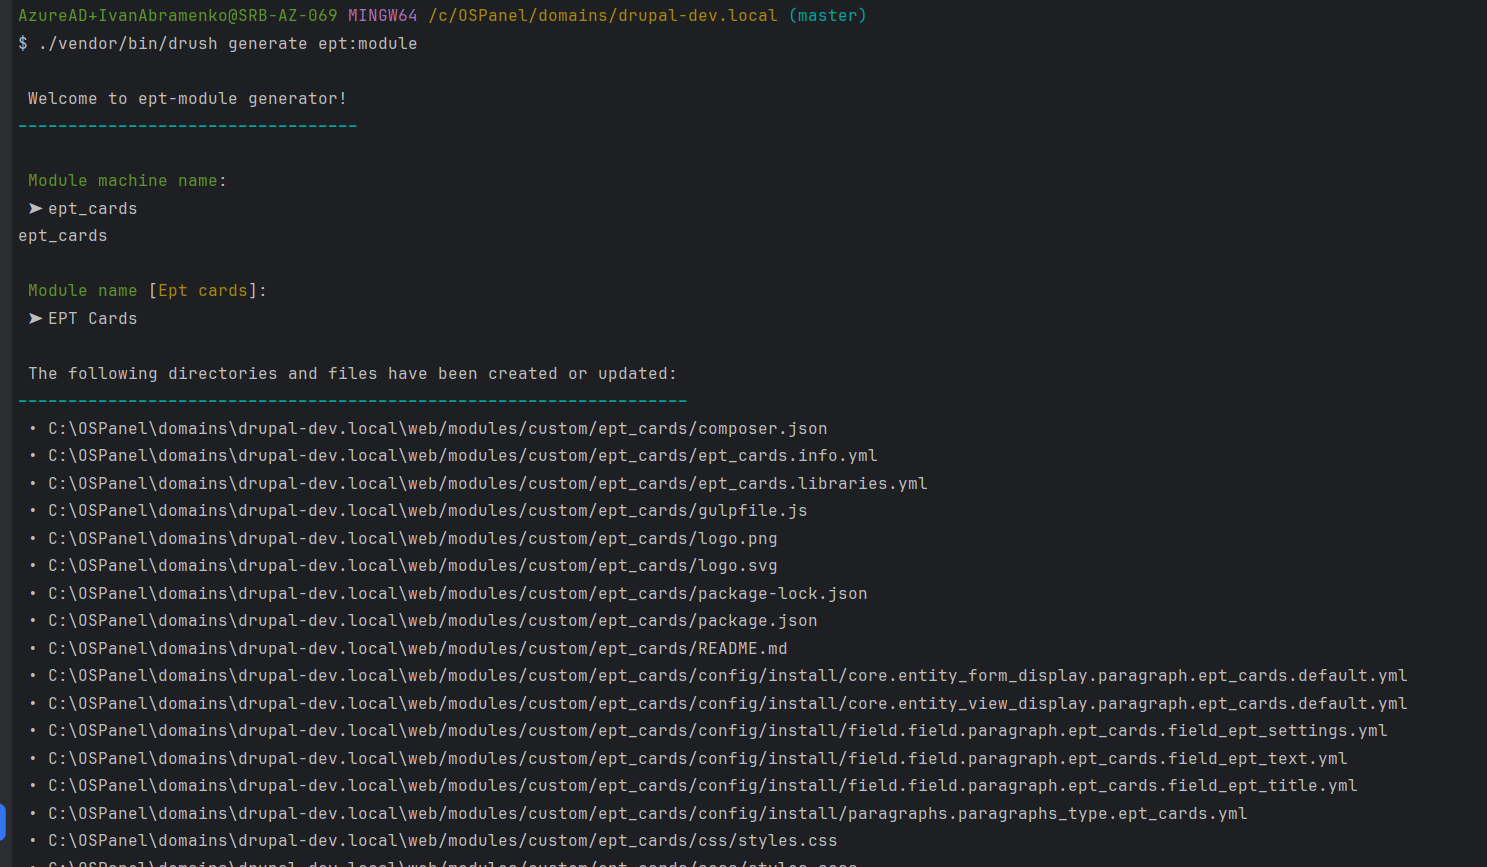
drush generate ept:module
Start machine name with ept_* prefix, it's required for working all EPT modules.
You can also use EPT Starterkit in EPT Core modules folder. Just rename all ePt_starterkit in files with machine name of your new EPT module.
https://www.drupal.org/project/ept_core
Or copy EPT Text module and replace machine name there.
https://www.drupal.org/project/ept_text
Because, it's simplest EPT module and it contains all basic EPT settings.

Creating the EPT module step by step
(Some screenshots may be from the EBT countdown module)
Copy the existing EPT Text module or the EPT Kickstarter module as a template, or use the drush generate ept:module command.
Copy the existing EPT Text module or the EPT Kickstarter module as a template, or use the drush generate ept:module command.
The EPT Text module contains the following folders:
/ept_text/config/install — contains configurations for the EPT Text paragraph type and field instances. Other EPT modules may contain configurations for paragraph types and field storage.
/ept_text/templates — contains the paragraph--ept-text--default.html.twig template for the paragraph.
/ept_text/tests — contains tests for EPT modules, currently only one installation test.
And other standard Drupal module files: composer.json, ept_text.info.yml, readme.md. More details about creating custom Drupal modules can be found in the official documentation:
https://www.drupal.org/docs/develop/creating-modules
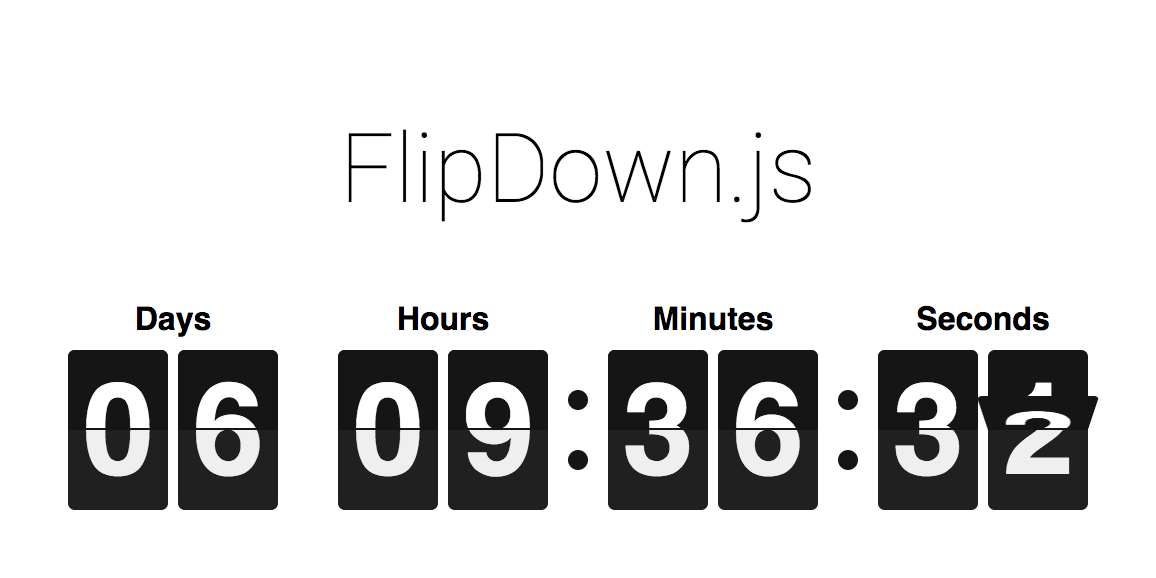
I will create a new EPT Countdown module that will use the following JavaScript plugin — FlipDown:
https://github.com/PButcher/flipdown
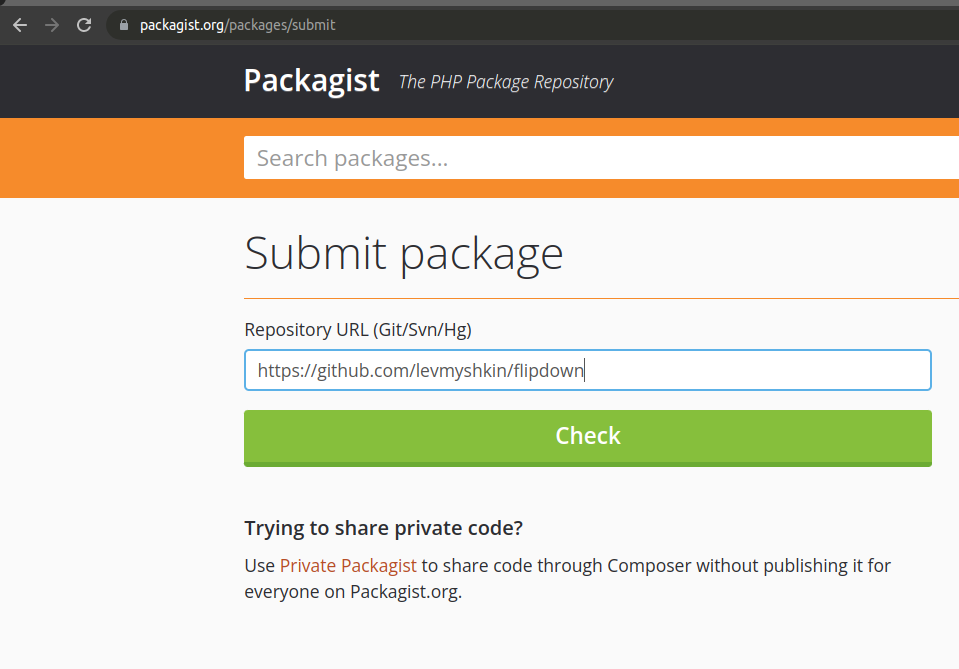
Fork the repository on GitHub and submit it to Packagist.
Fork the repository on GitHub and submit it to Packagist.
All third-party libraries must be forked and hosted on Packagist, for example:
https://packagist.org/packages/levmyshkin/flexslider
from:
https://github.com/levmyshkin/flexslider
Then Composer will be able to load them as regular libraries from Packagist. These third-party libraries must include the field "type": "drupal-library" in composer.json, and they will then be installed into the /libraries folder by default:
https://github.com/levmyshkin/flexslider/blob/master/composer.json

Let’s fork the FlipDown repository on GitHub.
It is generally not recommended to fork repositories instead of using original sources. However, I believe this makes it easier to use EPT modules without manually editing composer.json. Imagine how hard it is for a beginner to install Composer, manually modify composer.json, and correctly specify an external repository URL. Having your own library on Packagist simplifies the installation. Therefore, it's better to host all third-party libraries on Packagist.

On the fork’s GitHub page, you can rename the repository. The name should be simple, without capital letters or special characters. Hyphens (-) and underscores (_) are allowed.
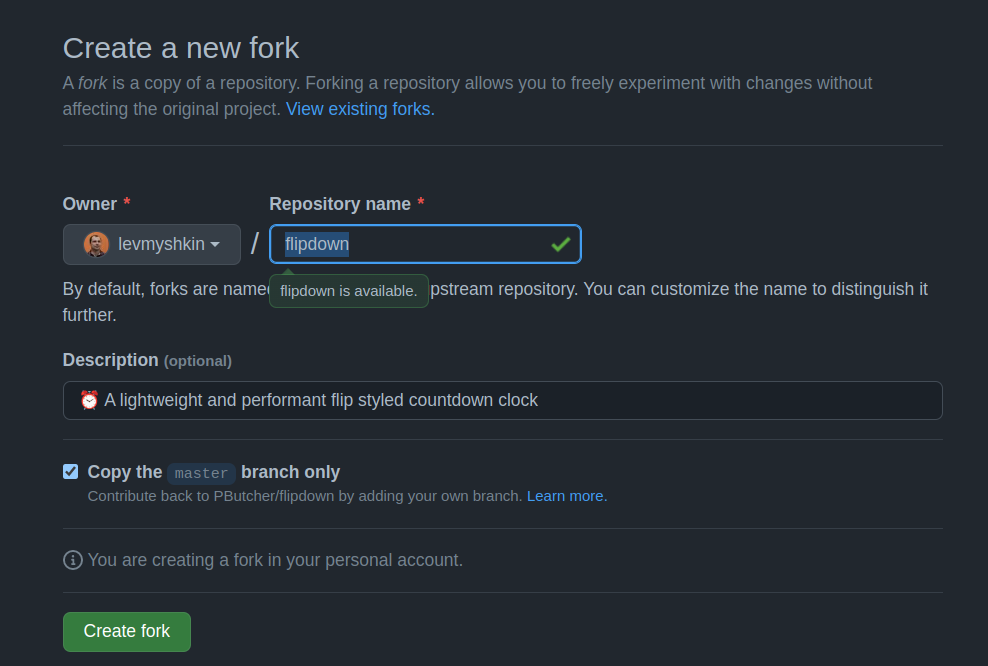
Now we have a new repository:
https://github.com/levmyshkin/flipdown
Let’s add a composer.json file with type "drupal-library":
git add composer.json
git commit -m 'Add Composer.json file'
git push origin master
The composer.json file is available at:
https://github.com/levmyshkin/flipdown/blob/master/composer.json
If you check the current tags in the repository, there will be none:
git tag
![]()
I usually follow the version of the original library. If the latest version was 1.4.6, I increase the minor version to 1.4.7. Since FlipDown had no tags, I created version 1.0.0:
git tag 1.0.0
git push origin 1.0.0
A tag is required because it contains the composer.json with type "library".
Why not just copy the JS library into the module?
You can only copy libraries with a GPL license. JavaScript libraries usually use the MIT license. Technically it's possible, but Drupal.org rules prohibit it:
https://www.drupal.org/about/licensing
Now let’s publish the FlipDown library on Packagist:
https://packagist.org/packages/submit
If you forgot to add composer.json with "type": "drupal-library" before publishing — no problem. Just add the file and create a new tag, Packagist will fetch the updates automatically.
Here’s the library page on Packagist:
https://packagist.org/packages/levmyshkin/flipdown

Make sure the library page lists the type as drupal-library.
Now let’s go back to our Drupal files and copy the ept_text folder; I’ll name the new module ept_countdown:
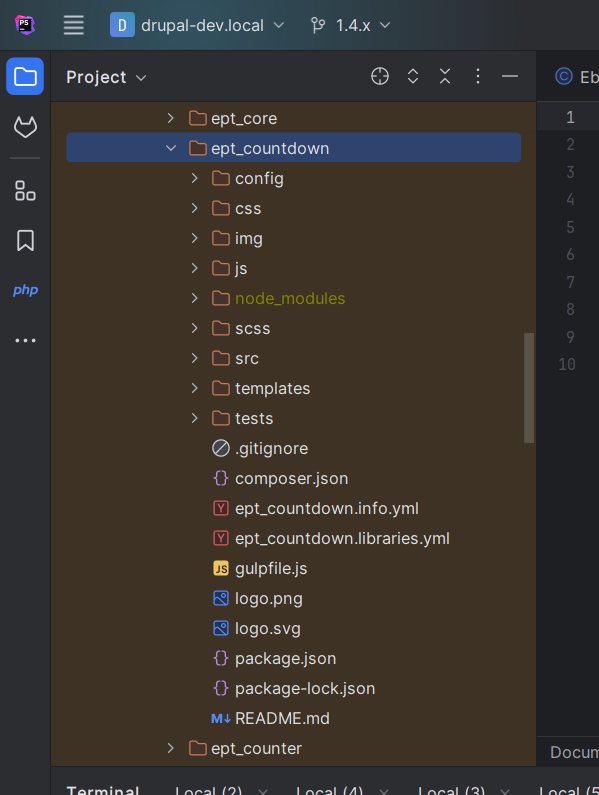
The following steps need to be performed:
- Delete configurations in /config/install — we’ll export new ones later.
- Replace all occurrences of ept_text with ept_countdown.
- Rename files, replacing "text" with "countdown".
- Update the module descriptions in ept_countdown.info.yml and README.md.
I will commit each step separately in Git, so you can track changes step by step:
git clone https://git.drupalcode.org/project/ept_countdown.git
Now we have a template for our module, and we can submit changes to Drupal.org.
Create a module project on Drupal.org.
Create a module project on Drupal.org.
Let's go to the drupal.org site to the project creation page:
https://www.drupal.org/node/add
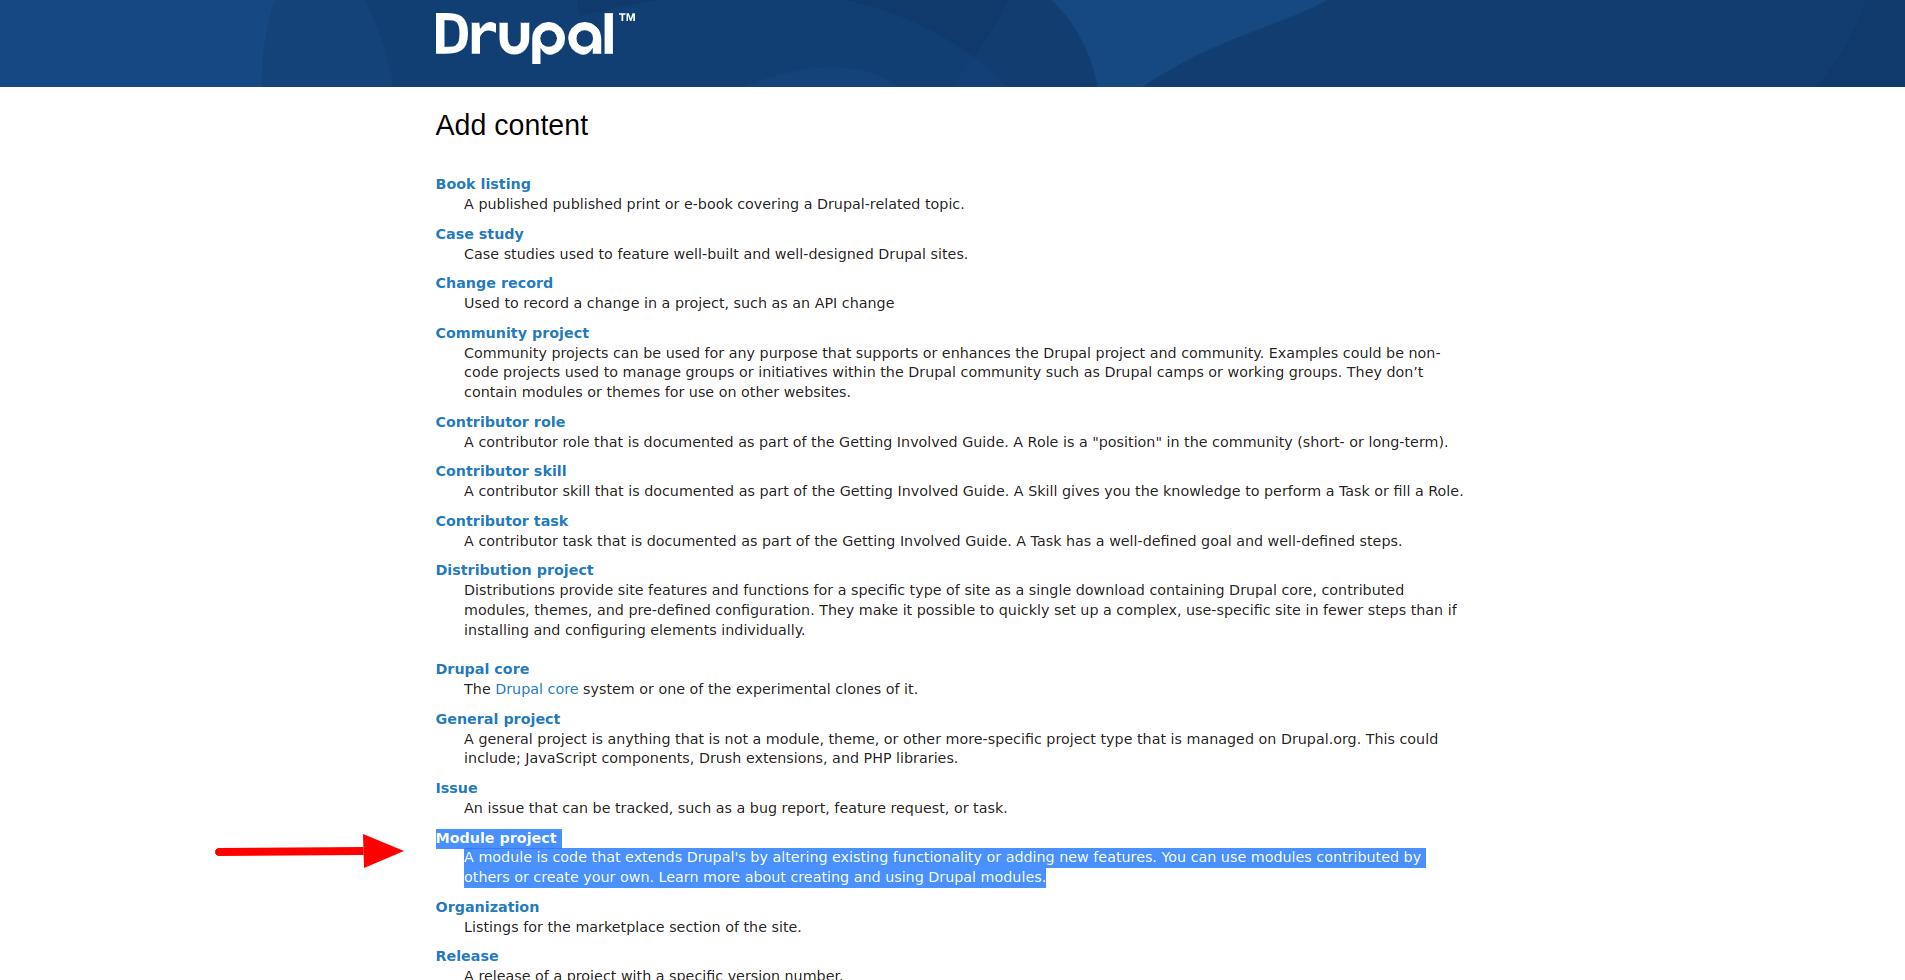
We need to add a project of the type Module:
https://www.drupal.org/node/add/project-module
Title: Extra Paragraph Types (EPT): Countdown
Project type: Full project
Short name: ept_countdown
Maintenance status: Actively maintained
Development status: Under active development
Module categories: Content, Content Display
Ecosystem: Extra Paragraph Types (EPT): Core
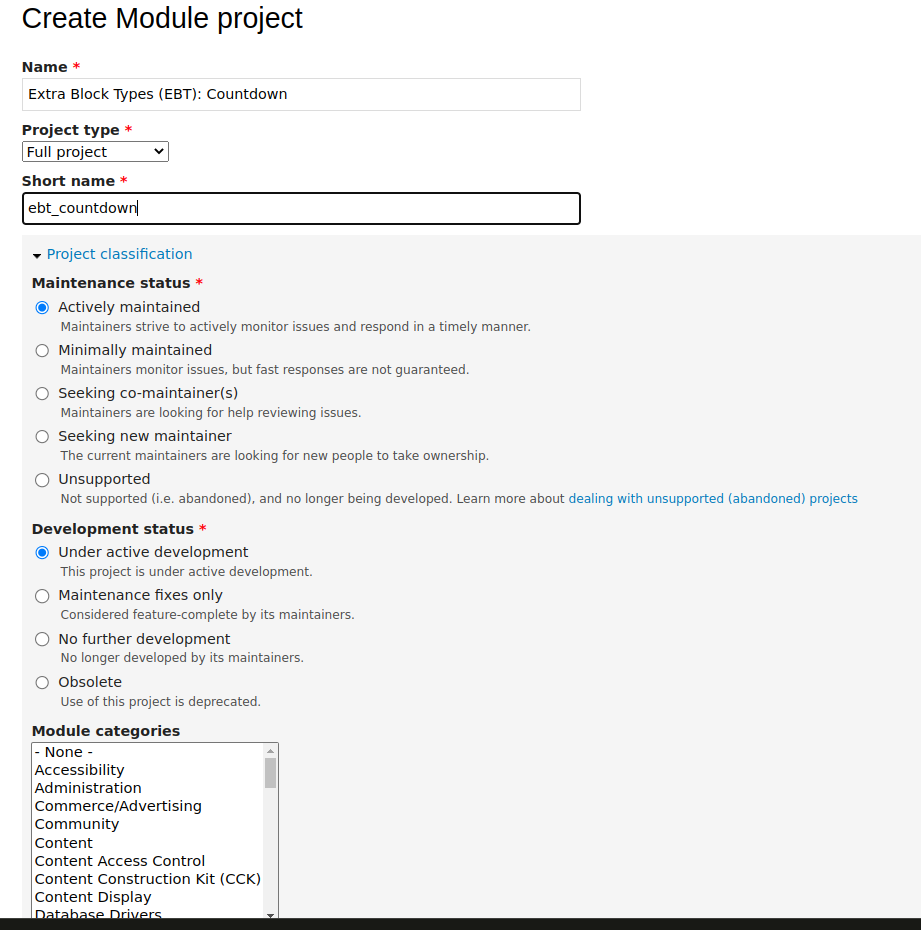
In the Description field, I usually insert the full list of available EPT modules (see the Markdown example above).
Now we have a module project page on Drupal.org:
https://www.drupal.org/project/ept_countdown
On the Version Control tab, you can find instructions on how to add a remote repository to your local Git project:
https://www.drupal.org/project/ept_countdown/git-instructions
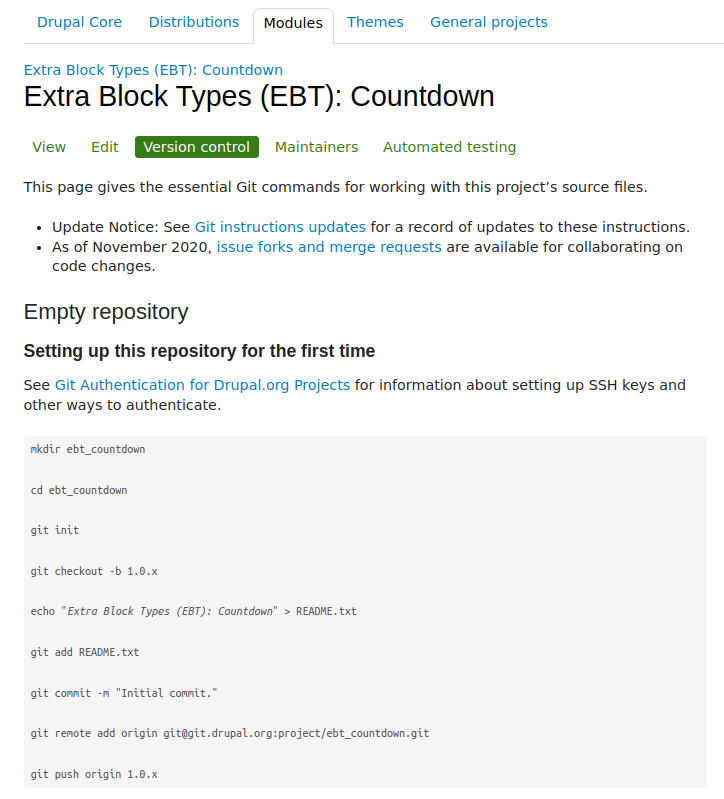
After the initial commit, you should create a new branch consistent with the main version of other EPT modules — currently this is 1.4.x.
Now we can begin adding new functionality to our module. The process is similar to developing a custom module: we will create a paragraph type, add fields, and include CSS/JS resources.
Getting Started with EPT Countdown Functionality Development
Step 1. Create the EPT Countdown paragraph type. Simply install the module if you generated it using Drush.
Getting Started with EPT Countdown Functionality Development
Step 1. Create the EPT Countdown paragraph type. Simply install the module if you generated it using Drush.
Simply install the module if you generated it using Drush.
First of all, you need to create a new paragraph type EPT Countdown:
/admin/structure/paragraphs_type/add
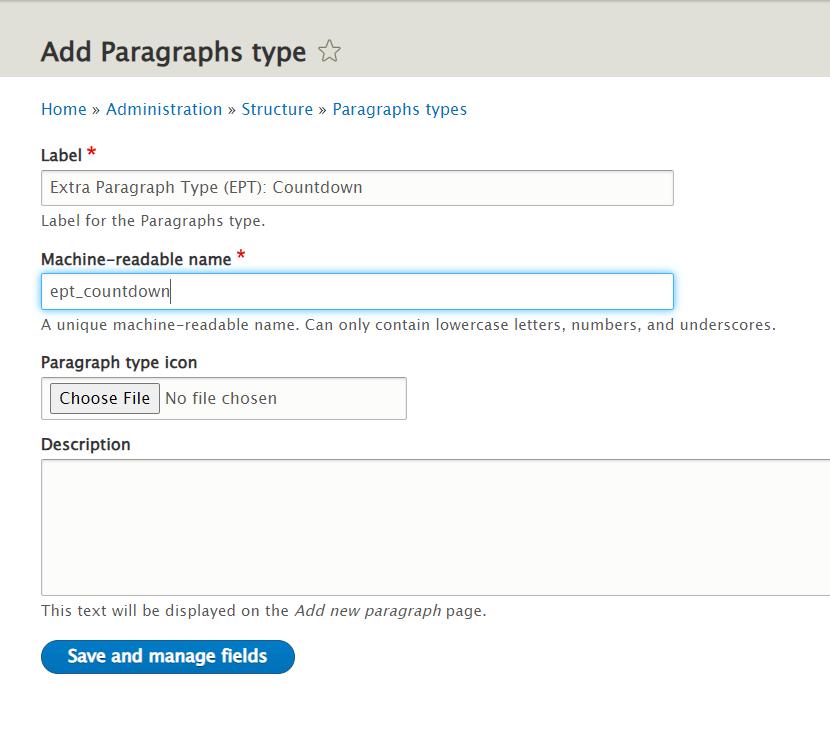
Make sure the machine name starts with ept_. I usually start the paragraph name with EPT — this way the machine name will be automatically formed correctly. Should the machine name match the module name? Yes, it is recommended for consistency and to avoid conflicts with other EPT modules. This is also important for overriding templates in modules instead of themes — see the function ept_core_theme_registry_alter() in the ept_core module.
Now add the field EPT Settings: field_ept_settings — this field is required for all EPT modules:
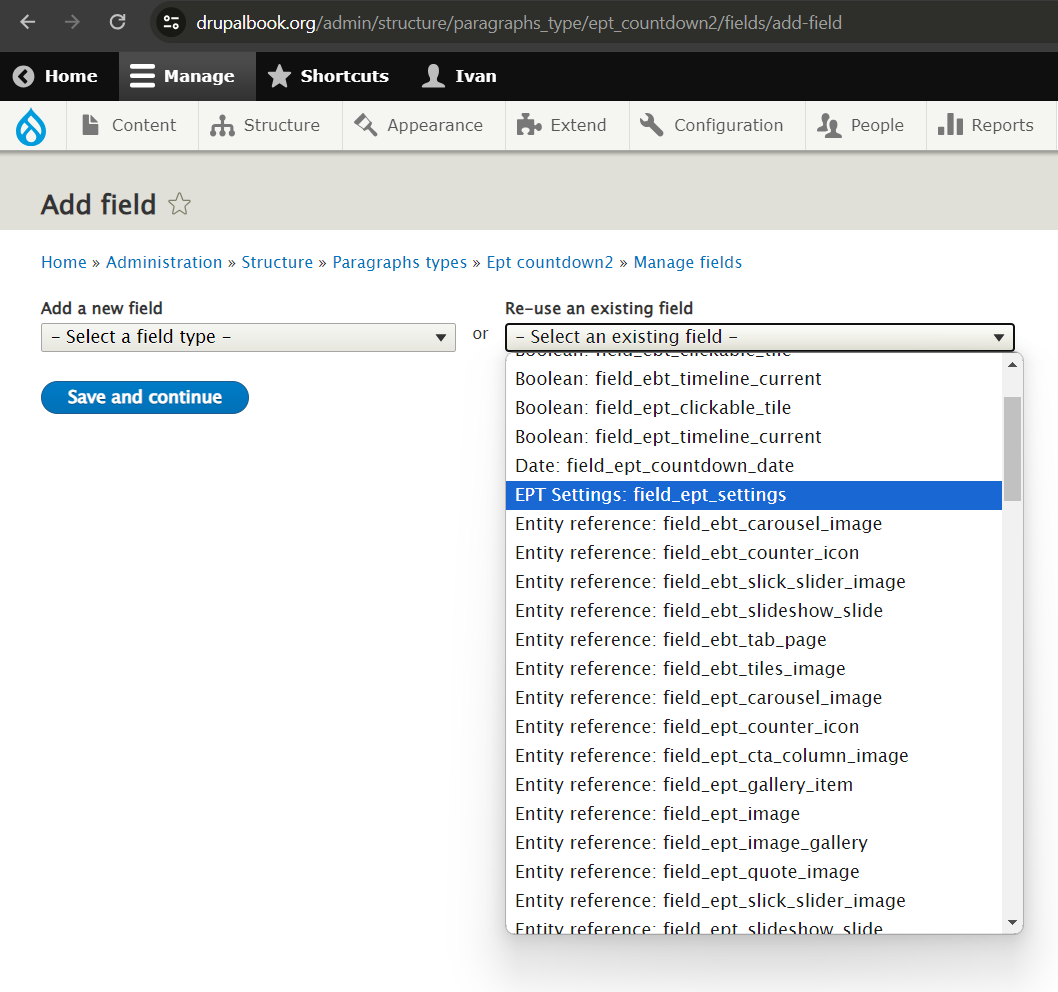
EPT Settings is a shared field from the EPT Core module; it provides DOM Box, background, spacing, and width settings.
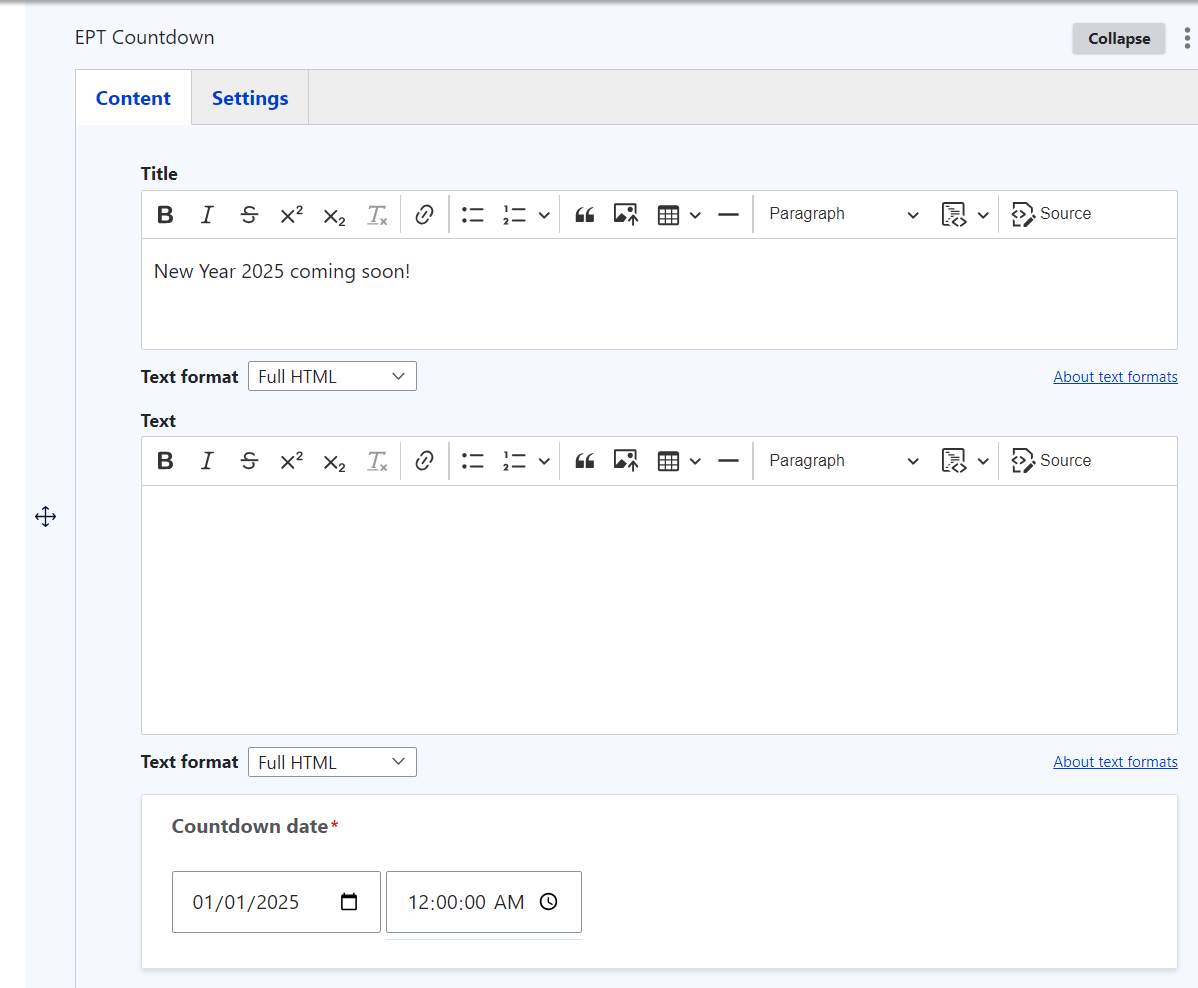
Since we need to count down to a date, add a date/time field:
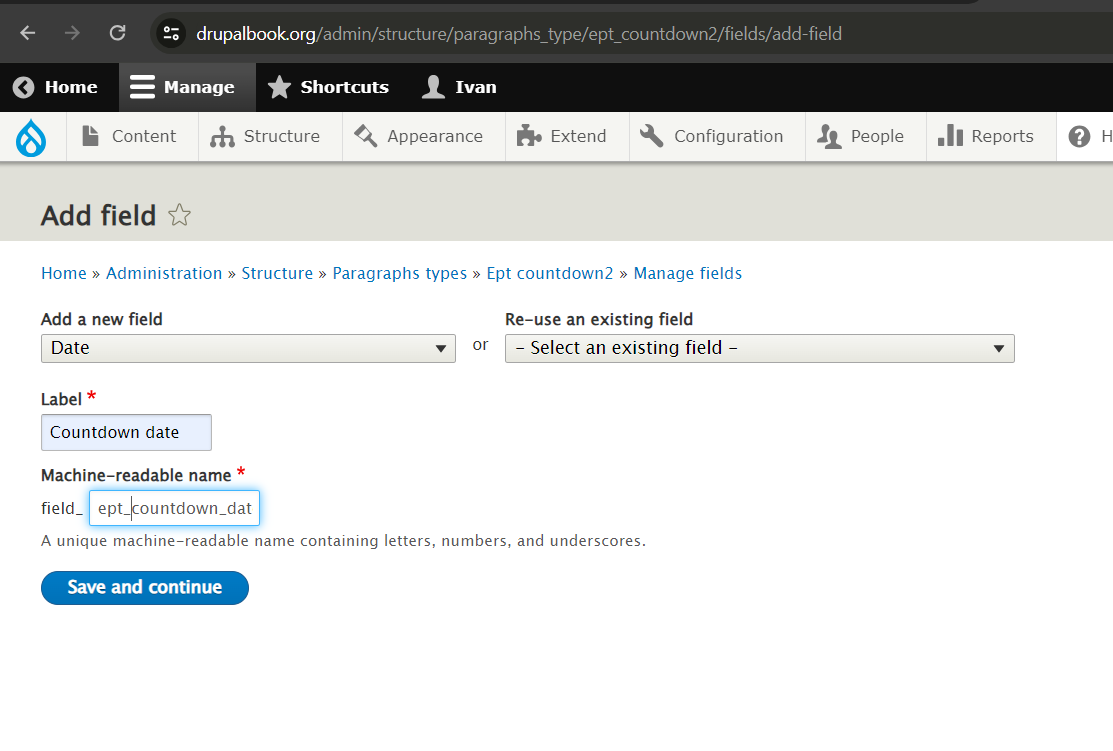
I added the ept_ prefix to the machine name, but it’s not required. You can name it, for example, field_countdown_date. We also have the default body and title fields — this is sufficient for the countdown paragraph.
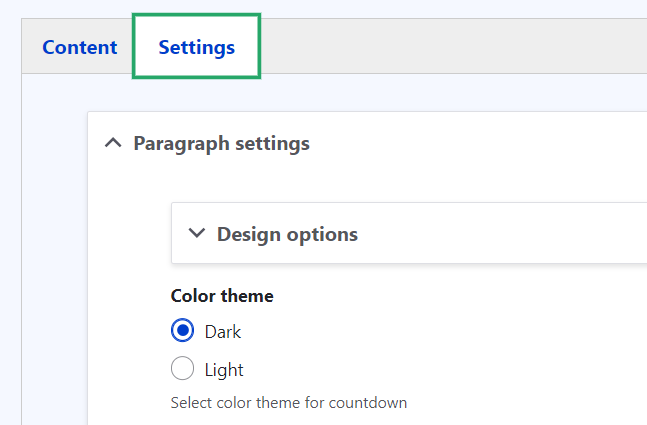
For EPT modules, we usually use horizontal tabs in the editing form:
This is not required, but it is convenient to separate content and settings, especially when there are many settings.
The parent group should be set to Tabs with the Horizontal direction and the Width Breakpoint parameter set to 120 (or any other small value):

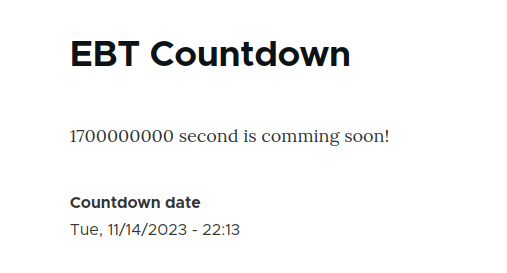
Now that we have the paragraph type, enable the EPT Countdown module to apply the templates:
/admin/modules

Enable the EPT Countdown paragraph for the desired content type with a paragraphs field:
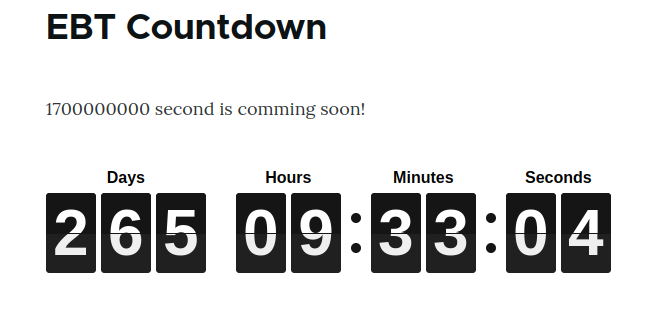
Here is what we get on the page:
Step 2. Connecting Third-Party Libraries in EPT Modules
Step 2. Connecting Third-Party Libraries in EPT Modules
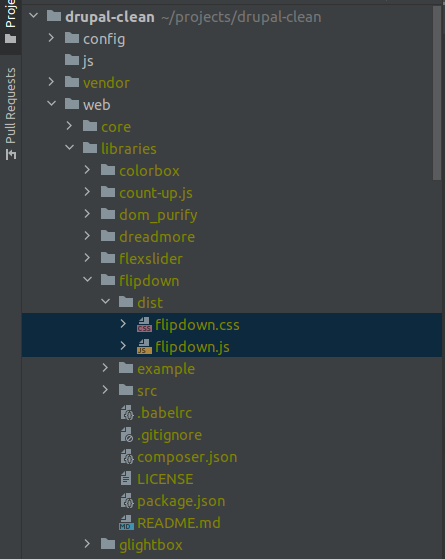
Now we can connect a third-party library. We already have the levmyshkin/flipdown library listed in composer.json, but since this is a custom module, we need to install the library manually via Composer:
composer require levmyshkin/flipdown
The library will be automatically installed into the /libraries folder:
Now create the ept_countdown.libraries.yml file and register FlipDown’s CSS/JS libraries, as well as a custom JS file ept_flipdown/js/ept_countdown.js, where the FlipDown plugin will be initialized later:
ept_countdown.libraries.yml:
ept_countdown:
  css:
    component:
      /libraries/flipdown/dist/flipdown.min.css: { minified: true }
  js:
    /libraries/flipdown/dist/flipdown.min.js: { minified: true }
    js/ept_countdown.js: {}
  dependencies:
    - core/once
    - core/drupalSettings
For files in the /libraries folder, we use absolute paths starting with a slash.
js/ept_countdown.js:
(function ($, Drupal) {

  /**
   * EBT Countdown behavior.
   */
  Drupal.behaviors.eptCountDown = {
    attach: function (context, settings) {

    }
  };

})(jQuery, Drupal);
We also need to attach the ept_countdown library in the paragraph templates. Don’t forget that we have two templates:
{{ attach_library('ept_countdown/ept_countdown') }}

Clear the cache and verify that the JavaScript files are loaded on the page:
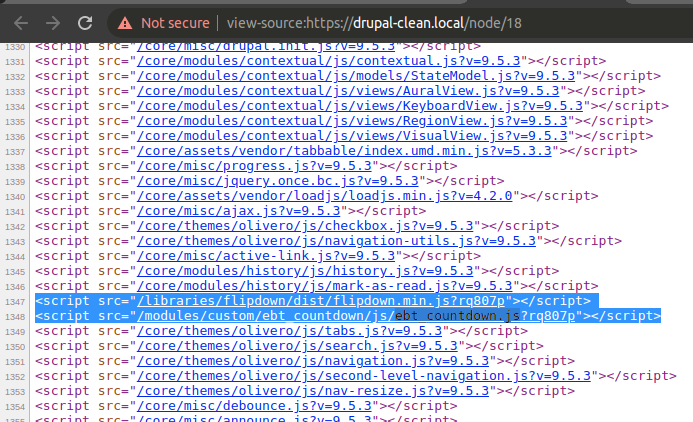
We will pass the date from PHP to JavaScript via drupalSettings. That’s why we extended the ept_countdown.libraries.yml file by adding the following dependencies:
  dependencies:
    - core/once
    - core/drupalSettings
Step 3. Connecting a Custom Field Widget for EPT Settings and Passing Variables to JavaScript
Step 3. Connecting a Custom Field Widget for EPT Settings and Passing Variables to JavaScript
In EPT modules, default settings are not passed to JavaScript. To enable this, we need to override the field widget class EptSettingsDefaultWidget:
File: ept_countdown/src/Plugin/Field/FieldWidget/EptSettingsCountDownWidget.php
<?php

namespace Drupal\ept_countdown\Plugin\Field\FieldWidget;

use Drupal\Core\Field\FieldItemListInterface;
use Drupal\Core\Form\FormStateInterface;
use Drupal\ept_core\Plugin\Field\FieldWidget\EptSettingsDefaultWidget;

/**
 * Plugin implementation of the 'ept_settings_countdown' widget.
 *
 * @FieldWidget(
 *   id = "ept_settings_countdown",
 *   label = @Translation("EPT Countdown settings"),
 *   field_types = {
 *     "ept_settings"
 *   }
 * )
 */
class EptSettingsCountDownWidget extends EptSettingsDefaultWidget {

  public function formElement(FieldItemListInterface $items, $delta, array $element, array &$form, FormStateInterface $form_state) {
    $element = parent::formElement($items, $delta, $element, $form, $form_state);

    $element['ept_settings']['pass_options_to_javascript'] = [
      '#type' => 'hidden',
      '#value' => TRUE,
    ];

    $element['ept_settings']['color_theme'] = [
      '#title' => $this->t('Color theme'),
      '#type' => 'radios',
      '#options' => [
        'dark' => $this->t('Dark'),
        'light' => $this->t('Light'),
      ],
      '#default_value' => $items[$delta]->ept_settings['color_theme'] ?? 'dark',
      '#description' => $this->t('Select color theme for countdown'),
      '#weight' => '3',
    ];

    $element['ept_settings']['styles'] = [
      '#title' => $this->t('Styles'),
      '#type' => 'radios',
      '#options' => [
        'default' => $this->t('Default'),
        'new_year' => $this->t('New Year'),
      ],
      '#default_value' => $items[$delta]->ept_settings['styles'] ?? 'default',
      '#description' => $this->t('Select special style for countdown'),
      '#weight' => '4',
    ];

    $element['ept_settings']['heading_days'] = [
      '#title' => $this->t('Heading Days'),
      '#type' => 'textfield',
      '#default_value' => $items[$delta]->ept_settings['heading_days'] ?? $this->t('Days'),
      '#description' => $this->t('Header for Days counter'),
      '#weight' => '5',
    ];

    $element['ept_settings']['heading_hours'] = [
      '#title' => $this->t('Heading Hours'),
      '#type' => 'textfield',
      '#default_value' => $items[$delta]->ept_settings['heading_hours'] ?? $this->t('Hours'),
      '#description' => $this->t('Header for Hours counter'),
      '#weight' => '6',
    ];

    $element['ept_settings']['heading_minutes'] = [
      '#title' => $this->t('Heading Minutes'),
      '#type' => 'textfield',
      '#default_value' => $items[$delta]->ept_settings['heading_minutes'] ?? $this->t('Minutes'),
      '#description' => $this->t('Header for Minutes counter'),
      '#weight' => '7',
    ];

    $element['ept_settings']['heading_seconds'] = [
      '#title' => $this->t('Heading Seconds'),
      '#type' => 'textfield',
      '#default_value' => $items[$delta]->ept_settings['heading_seconds'] ?? $this->t('Seconds'),
      '#description' => $this->t('Header for Seconds counter'),
      '#weight' => '8',
    ];

    return $element;
  }

  public function massageFormValues(array $values, array $form, FormStateInterface $form_state) {
    foreach ($values as &$value) {
      $value += ['ept_settings' => []];
    }
    return $values;
  }
}
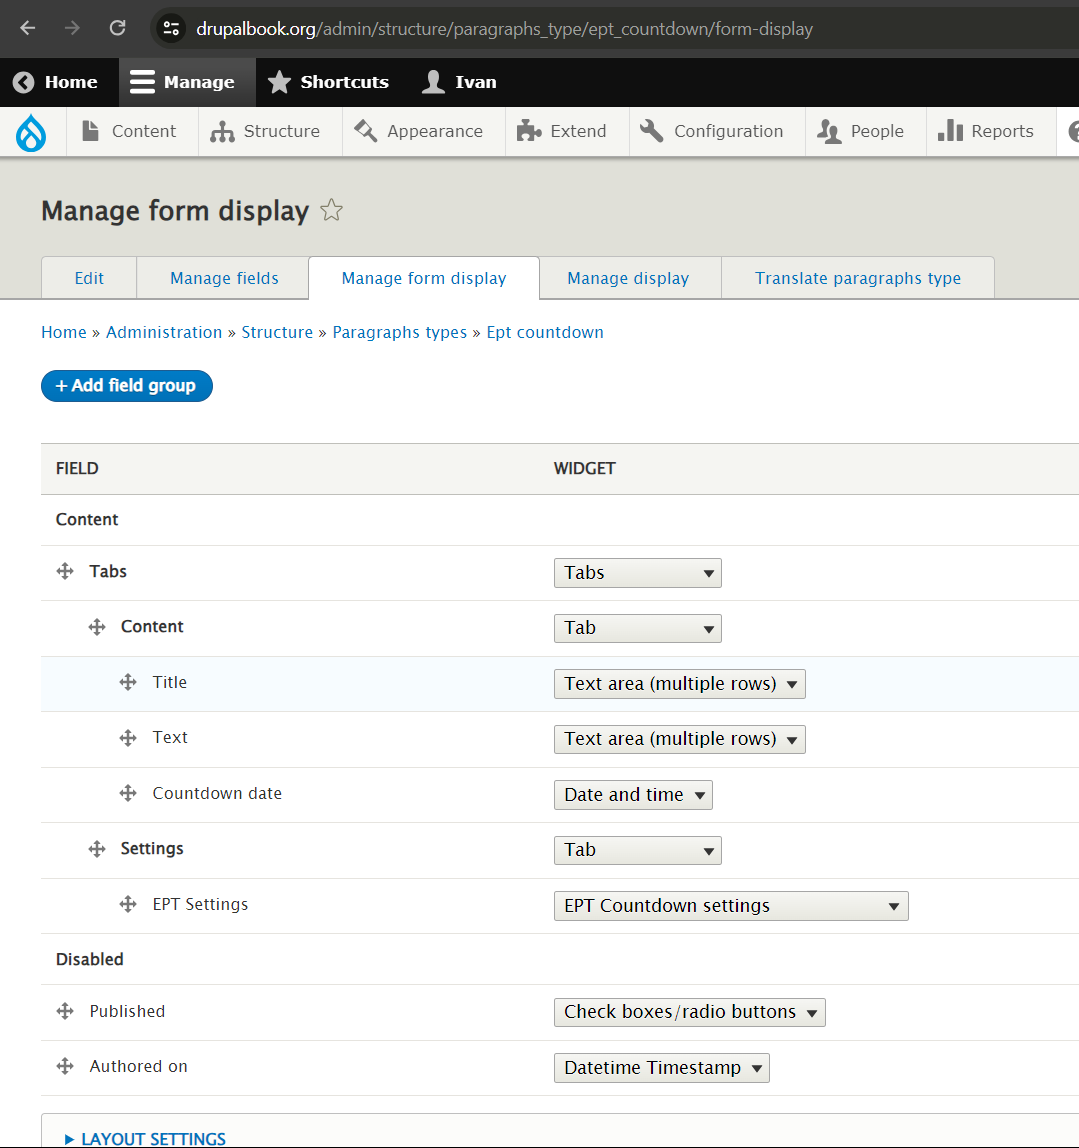
Now we can select our widget for the EPT Settings field:
Path: /admin/structure/paragraphs_type/ept_countdown/form-display

Save the paragraph and check the JavaScript variables via drupalSettings. Now all parameters from EPT Settings are passed to the script:
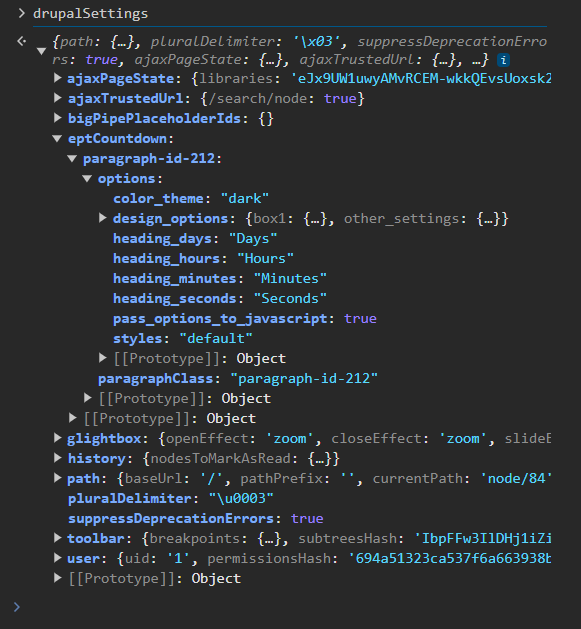
At the end of the paragraph-id-* key is the unique paragraph ID, which helps identify the corresponding paragraph.
The FlipDown plugin has a theme parameter (light/dark). We pass it using the color_theme field in the EptSettingsCountDownWidget widget:
$element['ept_settings']['color_theme'] = [
  '#title' => $this->t('Color theme'),
  '#type' => 'radios',
  '#options' => [
    'dark' => $this->t('Dark'),
    'light' => $this->t('Light'),
  ],
  '#default_value' => $items[$delta]->ept_settings['color_theme'] ?? 'dark',
  '#description' => $this->t('Select color theme for countdown'),
  '#weight' => '3',
];
Now the theme value can be retrieved in JavaScript via drupalSettings and used to apply the appropriate style:

Step 4. Initializing the FlipDown Plugin for the EPT Countdown Paragraph
Step 4. Initializing the FlipDown Plugin for the EPT Countdown Paragraph
We have already passed the paragraph settings to JavaScript via drupalSettings. Now we also need to pass the date value from the Date field. To do this, create an empty <div> in the template with a data-date attribute that stores the timestamp value. Use paragraph.id() to assign a unique paragraph ID:
File: paragraph--ept-countdown--default.html.twig
  <div
    class="ept-countdown-date ept-countdown-inline-block flipdown"
    id="paragraph-id-{{ paragraph.id() }}"
    data-date="{{ content.field_ept_countdown_date[0]['#attributes']['datetime']|date('U') }}">
  </div>

If you are unsure where the date value is stored, use the Twig Debugger module and insert {{ dump(content.field_ept_countdown_date) }} in the template.
The date('U') filter converts the date into Unix timestamp format.
Now include the custom JavaScript and initialize the FlipDown plugin:
File: /ept_countdown/js/ept_countdown.js
(function ($, Drupal) {

  /**
   * EPT Countdown behavior.
   */
  Drupal.behaviors.eptCountDown = {
    attach: function (context, settings) {
      var countdowns = once('ept-countdown-paragraph', '.ept-countdown-date', context);
      countdowns.forEach(function(countdown) {
        var eptOptions = drupalSettings['eptCountdown'][countdown.getAttribute('id')];
        var countdownTimestamp = parseInt(countdown.getAttribute('data-date'));
        var countdownId = countdown.getAttribute('id');

        new FlipDown(countdownTimestamp, countdownId, {
          theme: eptOptions['options']['color_theme'],
        }).start();
      });
    }
  };

})(jQuery, Drupal);
Don’t forget to clear the cache to apply the changes. After that, the FlipDown plugin should render properly on the page:
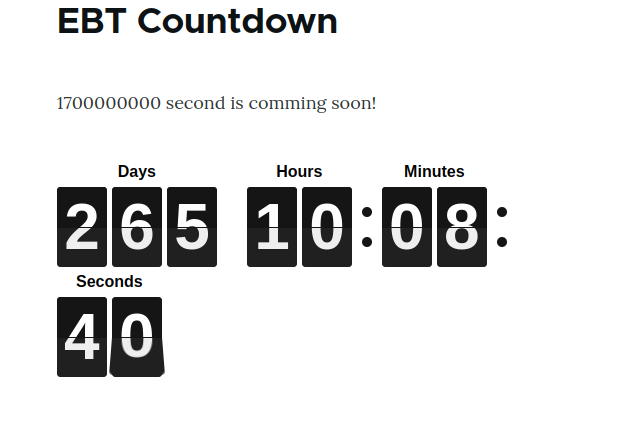
Step 5. Styling the New EPT Countdown Paragraph. For a module generated via Drush, the Gulp.js file is already included.
Step 5. Styling the New EPT Countdown Paragraph. For a module generated via Drush, the Gulp.js file is already included.
As we can see, even the default FlipDown styles do not render perfectly—for example, on desktop, numbers appear on two lines. But we can easily fix this with custom styles. Simply copy the gulpfile.js and package.json files from the EPT Counter module or the EPT Core Kickstarter module.
gulpfile.js:
// Load plugins
var gulp = require('gulp'),
    sass = require('gulp-dart-scss'),
    postcss = require("gulp-postcss"),
    autoprefixer = require("autoprefixer"),
    cssnano = require("cssnano"),
    notify = require('gulp-notify'),
    sassUnicode = require('gulp-sass-unicode');

var config = {
  scssSrc: 'scss/*.scss',
  allScss: 'scss/**/*.scss',
  cssDest: 'css/',
  allJs: 'assets/js/**/*.js',
  allImgs: 'assets/img/**/*'
};

function style() {
  return gulp.src(config.allScss)
    .pipe(sass())
    .pipe(sassUnicode())
    .pipe(postcss([autoprefixer()]))
    .pipe(gulp.dest(config.cssDest));
}

exports.style = style;

function watch(){
  gulp.watch('scss/**/*.scss', style)
}

exports.watch = watch;
package.json:
{
  "name": "ept_styles",
  "version": "1.0.0",
  "description": "Run npm install and then gulp watch",
  "main": "gulpfile.js",
  "scripts": {
    "test": "echo \"Error: no test specified\" && exit 1"
  },
  "devDependencies": {
    "autoprefixer": "^10.2.5",
    "cssnano": "^5.0.2",
    "gulp": "^4.0.2",
    "gulp-dart-scss": "^1.1.0",
    "gulp-notify": "^4.0.0",
    "gulp-postcss": "^9.0.0",
    "gulp-sass-unicode": "^1.0.5",
    "gulp-sourcemaps": "^3.0.0"
  },
  "dependencies": {
    "cucumber": "*",
    "postcss": "^8.2.13"
  }
}
The package-lock.json file will be generated automatically after running:
npm install
Then you can start the Gulp task with:
gulp watch
Now, add a SCSS file:
/ept_countdown/scss/flipdown.scss
.flipdown {
  width: 580px;
}
The flipdown.css file will be automatically compiled from flipdown.scss. Include it in ept_countdown.libraries.yml:
ept_countdown:
  css:
    component:
      /libraries/flipdown/dist/flipdown.min.css: { minified: true }
      css/flipdown.css: {}
Clear the cache and check the result:
The display is now significantly improved!
Can I use plain CSS instead of SCSS compilation?
Yes, you can. But most developers prefer writing SCSS because it is more convenient and scalable.
Step 6. Extending the Settings Form with Additional FlipDown Plugin Parameters
Step 6. Extending the Settings Form with Additional FlipDown Plugin Parameters
The FlipDown plugin supports the theme and headings parameters, which we can use for display customization. We have already created a custom field widget EptSettingsCountDownWidget, and now we will add the corresponding fields to it.
File: /ept_countdown/src/Plugin/Field/FieldWidget/EptSettingsCountDownWidget.php
public function formElement(FieldItemListInterface $items, $delta, array $element, array &$form, FormStateInterface $form_state) {
  $element = parent::formElement($items, $delta, $element, $form, $form_state);

  $element['ept_settings']['pass_options_to_javascript'] = [
    '#type' => 'hidden',
    '#value' => TRUE,
  ];

  $element['ept_settings']['color_theme'] = [
    '#title' => $this->t('Color theme'),
    '#type' => 'radios',
    '#options' => ['dark' => $this->t('Dark'), 'light' => $this->t('Light')],
    '#default_value' => $items[$delta]->ept_settings['color_theme'] ?? 'dark',
    '#description' => $this->t('Select color theme for countdown'),
    '#weight' => '3',
  ];

  $element['ept_settings']['styles'] = [
    '#title' => $this->t('Styles'),
    '#type' => 'radios',
    '#options' => ['default' => $this->t('Default'), 'new_year' => $this->t('New Year')],
    '#default_value' => $items[$delta]->ept_settings['styles'] ?? 'default',
    '#description' => $this->t('Select special style for countdown'),
    '#weight' => '4',
  ];

  $element['ept_settings']['heading_days'] = [
    '#title' => $this->t('Heading Days'),
    '#type' => 'textfield',
    '#default_value' => $items[$delta]->ept_settings['heading_days'] ?? $this->t('Days'),
    '#description' => $this->t('Header for Days counter'),
    '#weight' => '5',
  ];

  $element['ept_settings']['heading_hours'] = [
    '#title' => $this->t('Heading Hours'),
    '#type' => 'textfield',
    '#default_value' => $items[$delta]->ept_settings['heading_hours'] ?? $this->t('Hours'),
    '#description' => $this->t('Header for Hours counter'),
    '#weight' => '6',
  ];

  $element['ept_settings']['heading_minutes'] = [
    '#title' => $this->t('Heading Minutes'),
    '#type' => 'textfield',
    '#default_value' => $items[$delta]->ept_settings['heading_minutes'] ?? $this->t('Minutes'),
    '#description' => $this->t('Header for Minutes counter'),
    '#weight' => '7',
  ];

  $element['ept_settings']['heading_seconds'] = [
    '#title' => $this->t('Heading Seconds'),
    '#type' => 'textfield',
    '#default_value' => $items[$delta]->ept_settings['heading_seconds'] ?? $this->t('Seconds'),
    '#description' => $this->t('Header for Seconds counter'),
    '#weight' => '8',
  ];

  return $element;
}
Now we can use the headings and theme in the template. The element ID follows the pattern paragraph-id-{{ paragraph.id() }}, which lets us retrieve data from drupalSettings:
new FlipDown(countdownTimestamp, countdownId, {
  theme: eptOptions['options']['color_theme'],
  headings: [
    eptOptions['options']['heading_days'],
    eptOptions['options']['heading_hours'],
    eptOptions['options']['heading_minutes'],
    eptOptions['options']['heading_seconds'],
  ],
}).start();
Additionally, we use the styles value from the settings to dynamically assign styles in the template:
{%
  set classes = [
    'paragraph',
    'ept-paragraph',
    'ept-paragraph-countdown',
    'paragraph--type--' ~ paragraph.bundle|clean_class,
    'ept-paragraph--type--' ~ paragraph.bundle|clean_class,
    view_mode ? 'paragraph--view-mode--' ~ view_mode|clean_class,
    not paragraph.isPublished() ? 'paragraph--unpublished',
    'paragraph-id-' ~ paragraph.id(),
    content.field_ept_settings['#object'].field_ept_settings.ept_settings.styles,
    content.field_ept_settings['#object'].field_ept_settings.ept_settings.color_theme,
  ]
%}
Attach the new_year styles conditionally if the corresponding style is selected:
{% if content.field_ept_settings['#object'].field_ept_settings.ept_settings.styles == 'new_year' %}
  {{ attach_library('ept_countdown/new_year') }}
{% endif %}
ept_countdown.libraries.yml:
new_year:
  css:
    component:
      css/new-year.css: {}
/ept_countdown/scss/new-year.scss:
.ept-paragraph-countdown.new_year {
  background: url(../img/snowflakes.webp) center center repeat;
}
Result:

You can add any number of custom styles for new or existing EPT modules. You can also suggest your styles by creating an issue on Drupal.org:
Step 7. Exporting Configurations for EPT Paragraphs and Fields
Step 7. Exporting Configurations for EPT Paragraphs and Fields
We have completed adding functionality to EPT Countdown. Now it's time to export the configurations and prepare the module for release on Drupal.org.
All configurations related to the EPT Countdown paragraph must be copied to the /ept_countdown/config/install folder.
If the module was generated using Drush, you should re-export the configurations to ensure all field and paragraph type settings are updated.
After this, you can enable the module on the Extend page — /admin/modules. All paragraph and field configurations for EPT Countdown will be automatically installed from /config/install:
There is no need to include language.* configuration files, since the Language module might be disabled on some sites.
I usually copy all required YAML files and ensure they are placed under config/install:
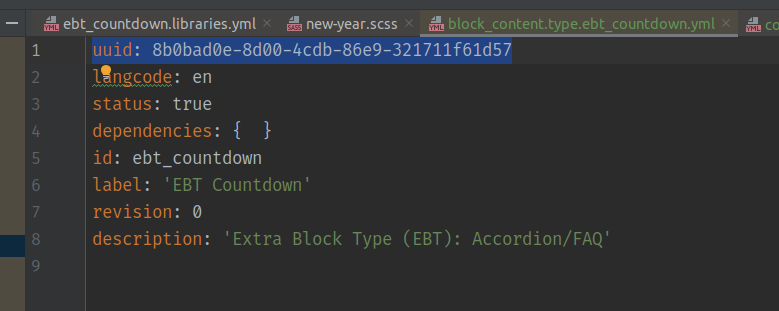
Before committing, be sure to remove the uuid and hashes from the YAML files:
If your module depends on other Drupal modules (e.g., datetime), be sure to list them as dependencies in the .info.yml file:
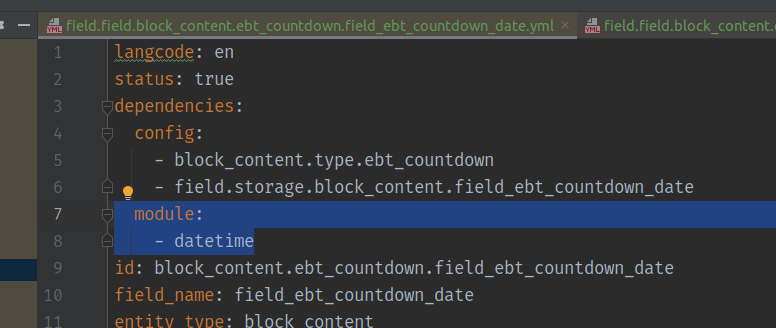
/ept_countdown/ept_countdown.info.yml:
dependencies:
  - drupal:datetime
Your module is now ready for upload and publication on Drupal.org.
Step 8. Deployment on Drupal.org and Testing
Step 8. Deployment on Drupal.org and Testing
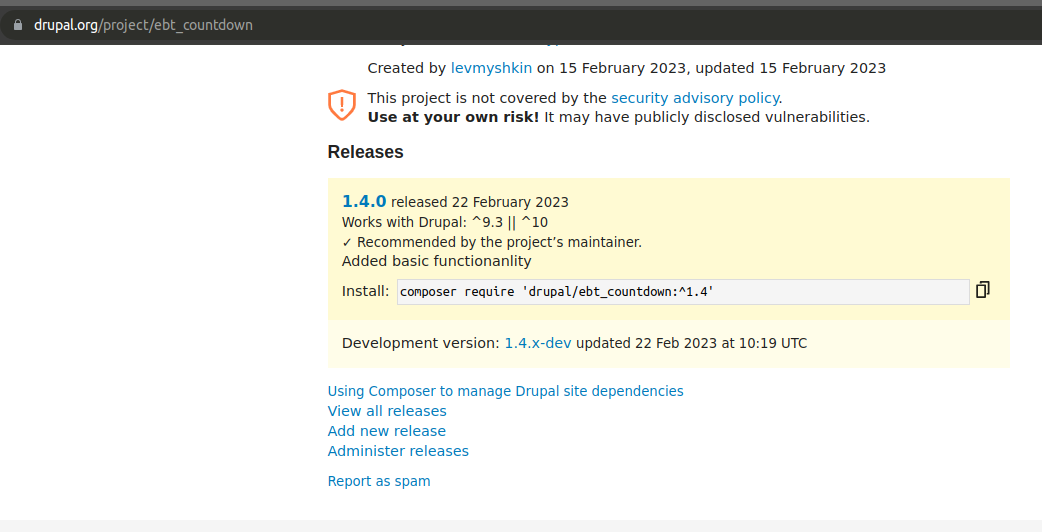
We have already created a new project on Drupal.org:
https://www.drupal.org/project/ept_countdown
The main branch selected is 1.4.x, to stay consistent with other modules in the EPT ecosystem:
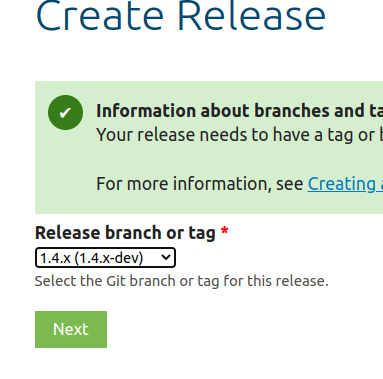
All releases will now start from version 1.4.0:
git tag 1.4.0
git push origin 1.4.0
You can also create pre-release versions such as -alpha or -beta before publishing the stable 1.4.0 release.
You need to wait 10 days after creating the project before the module can be included in the Security Advisory Coverage program:
You can now test the new module across different content types, verify FlipDown behavior, theme settings, and headings. If needed, file bug reports and release patches.
Step 9. Adding the README.md File
Step 9. Adding the README.md File
If you generated the EPT module using Drush, the README.md file should already be created automatically.
In any case, don’t forget to include a README.md file in your module. This is an important file that contains the module description, requirements, installation steps, and usage guidelines. You can view an example in another EPT module:
https://www.drupal.org/project/ept_slideshow
Thank you for using EPT modules! You can always ask questions or share ideas: