Creating new EBT modules
Easiest way to create a new EBT module is Drush command (for Drush 12+). To use this command, you need to enable EBT Core Starterkit module:
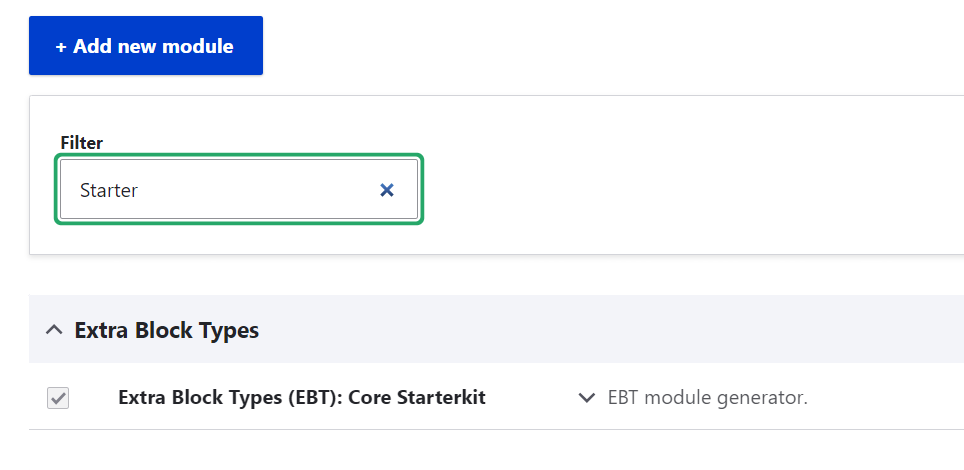
After that generator EBT modules will be available:
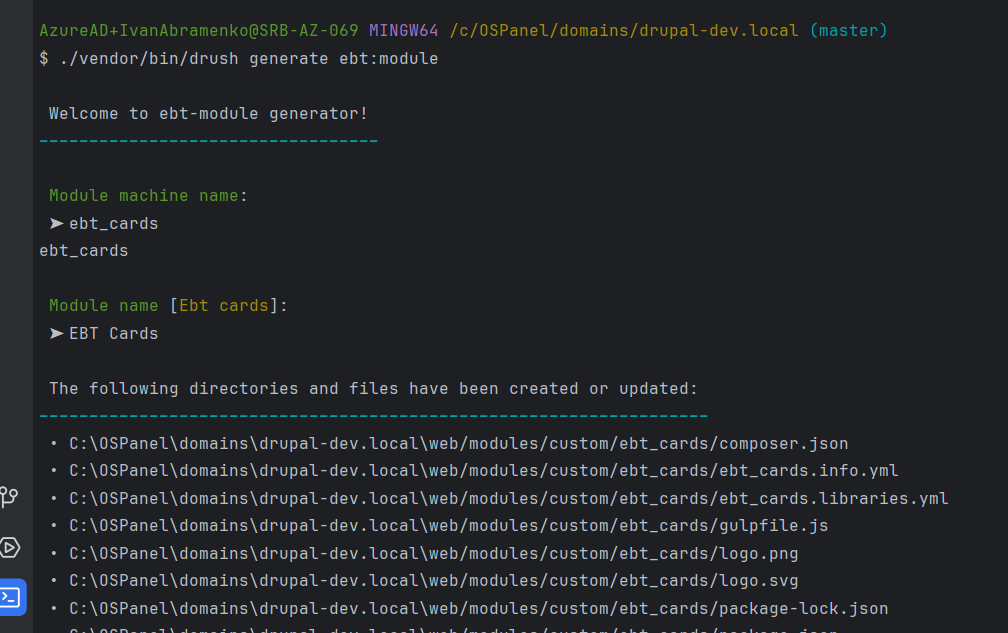
drush generate ebt:module
Start machine name with ebt_* prefix, it's required for working all EBT modules.
You can also use EBT Starterkit in EBT Core modules folder. Just rename all ebt_starterkit in files with machine name of your new EBT module.
https://www.drupal.org/project/ebt_core
Or copy EBT Text module and replace machine name there.
https://www.drupal.org/project/ebt_text
Because, it's simplest EBT module and it contains all basic EBT settings.

Creating EBT Module step by step
Copy existing EBT Text module as boilerplate or use drush generate ebt:module command.
Copy existing EBT Text module as boilerplate or use drush generate ebt:module command.
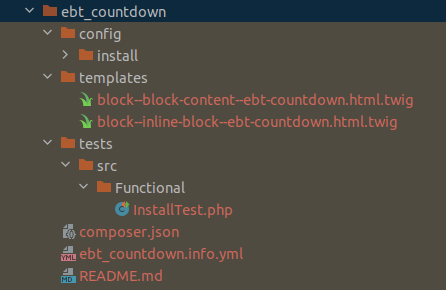
EBT Text module contains next folders:
/ebt_text/config/install - with configs for EBT Text block type and field instances. Other EBT modules can contain configs for paragraph types and field storages.
/ebt_text/templates - here is block--block-content--ebt-text.html.twig template for content block which can be used in Block layout page and block--inline-block--ebt-text.html.twig template for Layout Builder inline blocks.
/ebt_text/tests - here are tests for EBT modules, now only one test for installation module.
And other regular drupal module files: composer.json, ebt_text.info.yml, readme.md. You can read more about creating custom Drupal modules in official documentation:
https://www.drupal.org/docs/develop/creating-modules
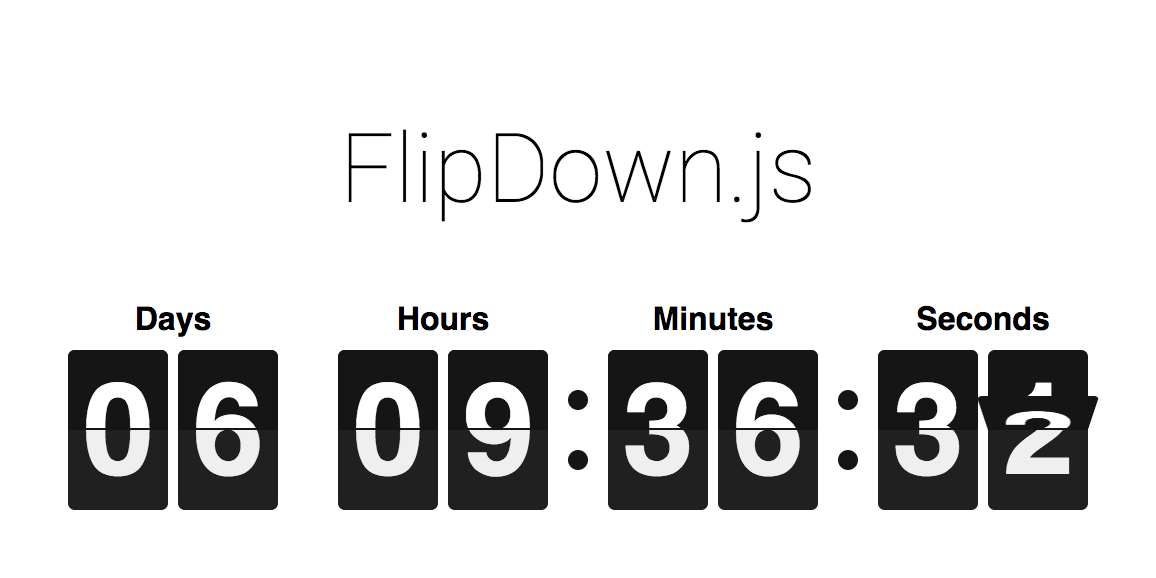
I will create a new module EBT Countdown which will use this javascript plugin FlipDown:
https://github.com/PButcher/flipdown
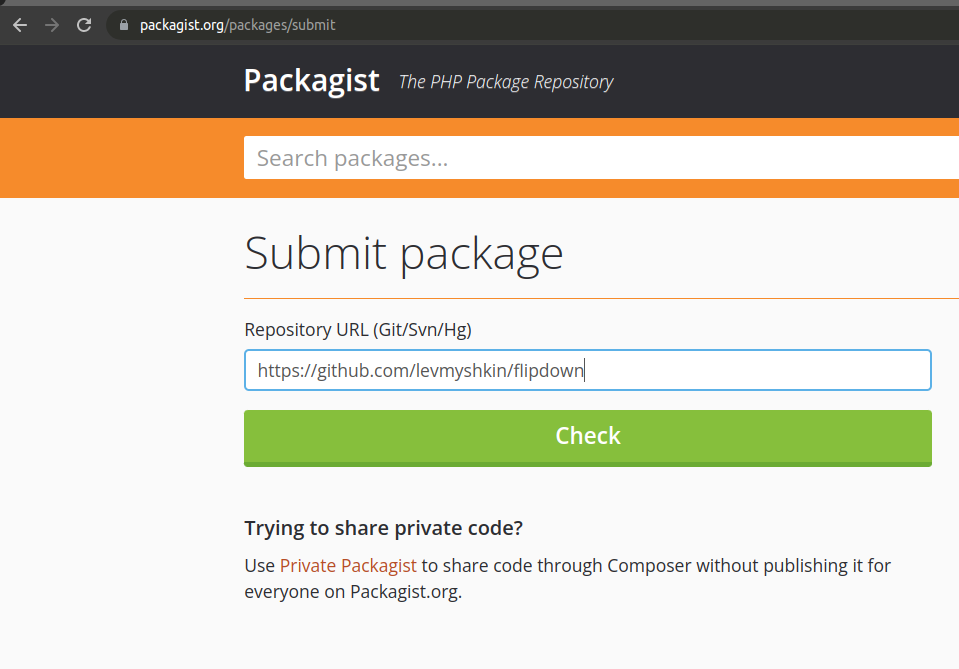
Fork Github repository and submit it to Packagist
Fork Github repository and submit it to Packagist
All 3rd party libraries should be forked and placed on Packagist, for example:
https://packagist.org/packages/levmyshkin/flexslider
from:
https://github.com/levmyshkin/flexslider
Then Composer can download them as usual packagist libraries. These 3rd party libraries must have "type": "drupal-library", and they will be download in /libraries folder, by default:
https://github.com/levmyshkin/flexslider/blob/master/composer.json

Let's fork github repository for FlipDown.
It might be unusual to fork git repositories, instead of using source git repositories. But I believe it will be easier to use EBT modules without manipulations with main composer.json file to add external links to repositories in it. Imagine, how it's hard for newbies to install composer, update composer.json file manually and place repository source in right place. With own packagist library the process of installation is getting simple. So let's keep all 3rd party libraries on packagist.

On forking git repo page you can rename repository. You must keep it clean, without Capital letters and special chars, dash - and underscore _ are working fine.
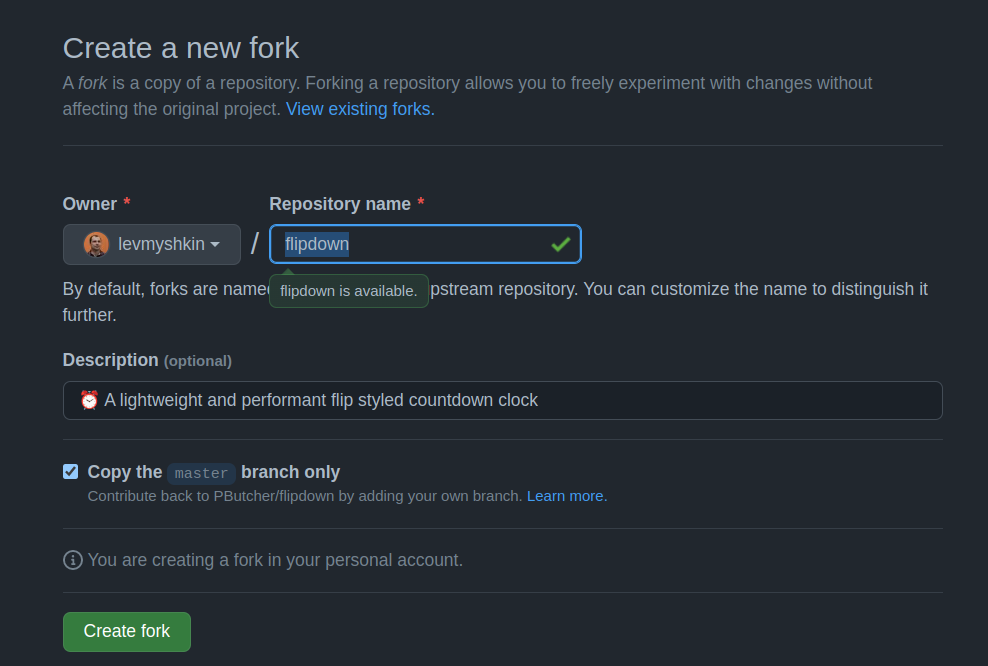
Now we have a new git repo:
https://github.com/levmyshkin/flipdown
Then we need to add composer.json file in this repository with "type": "drupal-library":
git add composer.json
git commit -m 'Add Composer.json file'
git push origin master
Here is composer.json file:
https://github.com/levmyshkin/flipdown/blob/master/composer.json
If you check your current tags in new git repo, it will be empty:
git tag
![]()
Usually I follow version from source repo, for example if latest version of library was 1.4.6, I just increment minor version to 1.4.7. FlipDown repo didn't have any tags or releases, so I created 1.0.0 version for new repo:
git tag 1.0.0
git push origin 1.0.0
We need new tag, because it contains our new composer.json with "type": "library"
Why we can't simply copy javascript library inside module?
We can copy only libraries under GPL license, but usually javascipt libraries uses MIT license. It's possible to do technically, but it's prohibited by Drupal.org rules:
Let's submit FlipDown library on packagist.org:
https://packagist.org/packages/submit
If you submitted library and forgot to add composer.json with "type": "drupal-library", don't worry, just add composer.json file and create new tag for your git repository. This tag will be automatically pushed on packagist.
Here is packagist library page for FlipDown:
https://packagist.org/packages/levmyshkin/flipdown

Be sure that you have drupal-library type on packagist page.
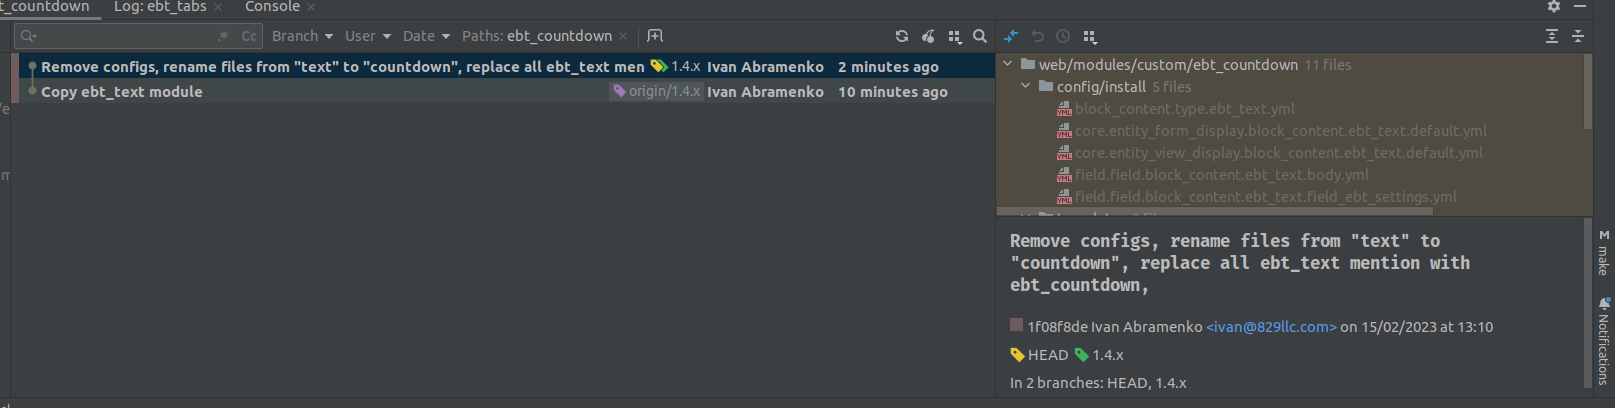
Let's go back to our drupal files and copy ebt_text folder, I will name new module ebt_countdown:
We need to:
- remove configs in /config/install, we will export new configs later
- replace all ebt_text mention with ebt_countdown
- rename files to have "countdown" instead of "text"
- update texts for module description in ebt_countdown.info.yml and README.md files.
I will commit each step separately in git, so you could see updates step by step:
git clone https://git.drupalcode.org/project/ebt_countdown.git
Now we have boilerplate for our module and can push changes on Drupal.org.
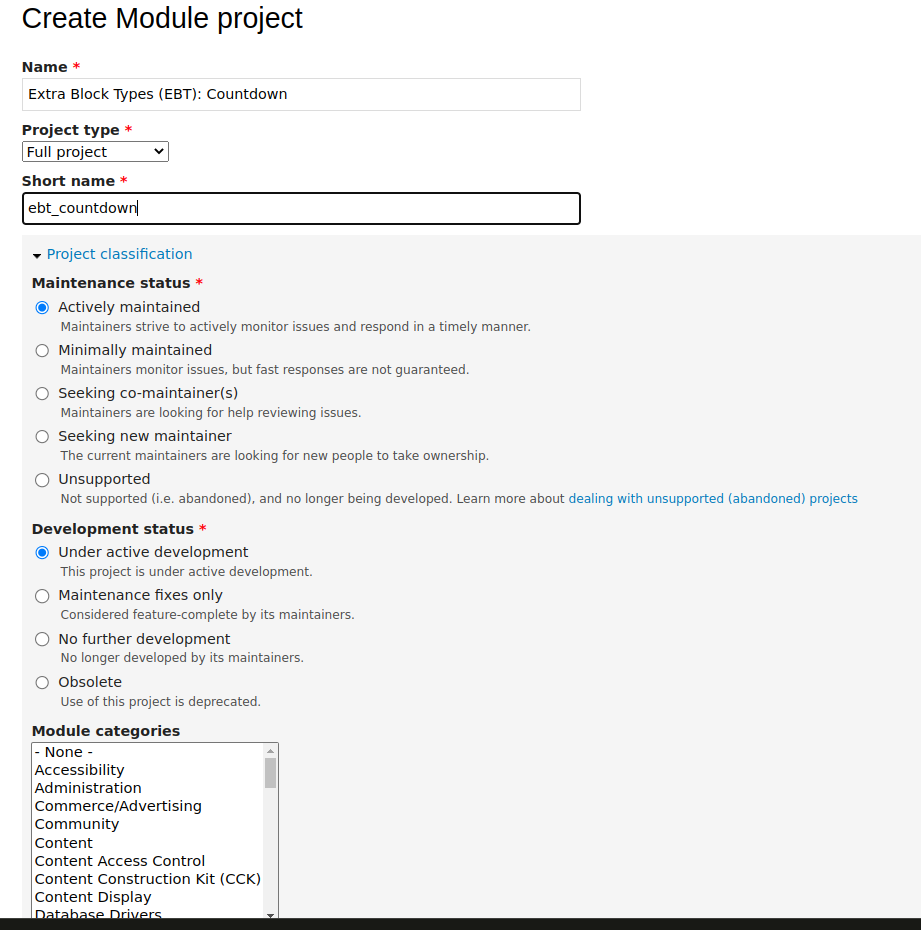
Create module project on Drupal.org
Create module project on Drupal.org
Let's go on drupal.org site on adding project page:
https://www.drupal.org/node/add
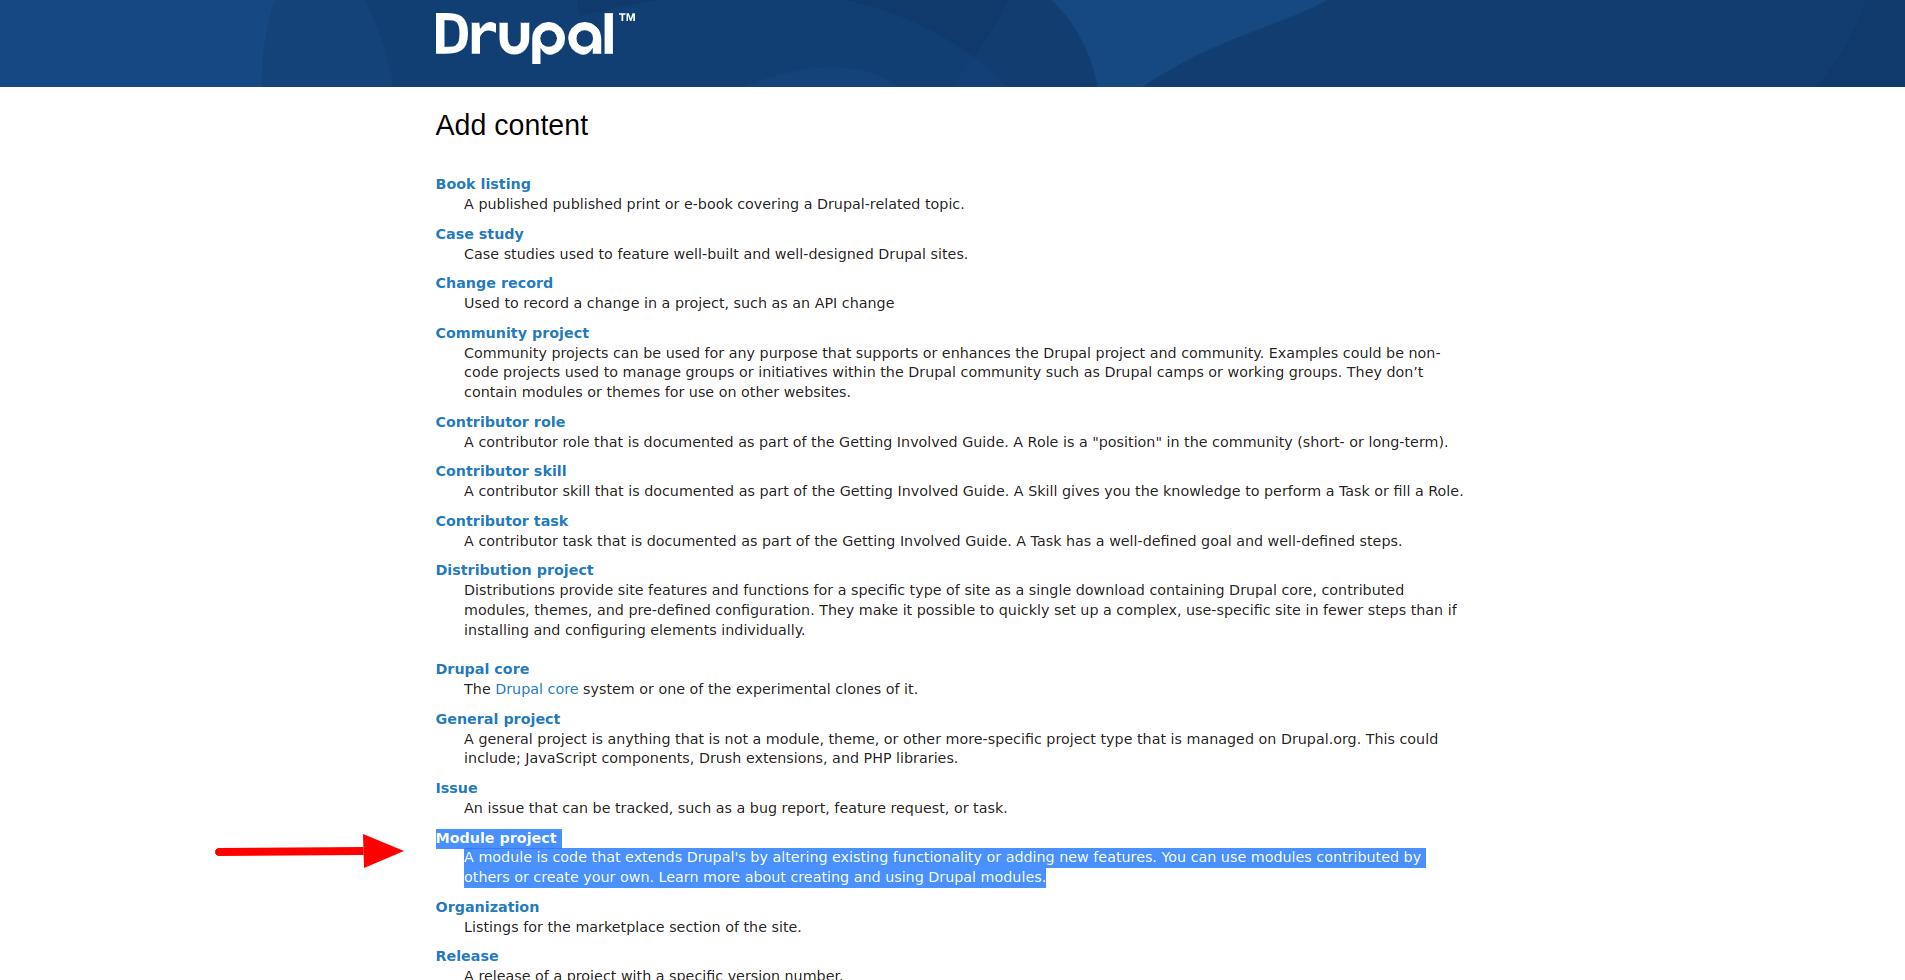
We need to add Module project:
https://www.drupal.org/node/add/project-module
Name: Extra Block Types (EBT): Countdown
Project type: Full project
Short name: ebt_countdown
Maintenance status: Actively maintained
Development status: Under active development
Module categories: Content, Content Display
Ecosystem: Extra Block Types (EBT): Core (3191928)
In Description field I usually insert full list of available EBT modules:
Extra Block Types: Countdown module provides ability to add a block with animated countdown.

EBT allows to choose styles for countdown via UI.

EBT modules provide ability to add different blocks in Layout Builder in few clicks. You can install separate block types from this bunch of EBT modules:
<ul>
  <li><a href="https://www.drupal.org/project/ebt_accordion" title="EBT Accordion / FAQ">EBT Accordion / FAQ</a></li>
  <li><a href="https://www.drupal.org/project/ebt_basic_button" title="EBT Basic Button">EBT Basic Button</a></li>
  <li><a href="https://www.drupal.org/project/ebt_bootstrap_button" title="EBT Bootstrap Button">EBT Bootstrap Button</a></li>
  <li><a href="https://www.drupal.org/project/ebt_cta" title="EBT Call to Action">EBT Call to Action</a>
  <li><a href="https://www.drupal.org/project/ebt_carousel" title="EBT Tabs">EBT Carousel</a>
  <li><a href="https://www.drupal.org/project/ebt_counter" title="EBT Counter">EBT Counter</a>
  <li><a href="https://www.drupal.org/project/ebt_image_gallery">EBT Image Gallery</a></li>
  <li><a href="https://www.drupal.org/project/ebt_quote" title="EBT Quote">EBT Quote</a></li>
  <li><a href="https://www.drupal.org/project/ebt_slick_slider">EBT Slick Slider</a></li>
  <li><a href="https://www.drupal.org/project/ebt_slideshow">EBT Slideshow</a></li>
  <li><a href="https://www.drupal.org/project/ebt_stats">EBT Stats</a></li>
  <li><a href="https://www.drupal.org/project/ebt_tabs" title="EBT Tabs">EBT Tabs</a></li>
  <li><a href="https://www.drupal.org/project/ebt_text">EBT Text</a></li>
  <li><a href="https://www.drupal.org/project/ebt_timeline">EBT Timeline</a></li>
  <li><a href="https://www.drupal.org/project/ebt_webform">EBT Webform</a></li>
  <li><a href="https://www.drupal.org/project/ebt_webform_popup">EBT Webform Popup</a></li>
</ul>

All EBT block types contain default widget for EBT blocks, which has Design options for:
<ul>
<li>CSS Box (margins, paddings, borders)</li>
<li>Background using color, image (including parallax and cover), video (Youtube)</li>
<li>Edge to edge, Container width</li>
</ul>

More about EBT blocks read on EBT Core module page:
https://www.drupal.org/project/ebt_core

<div class="container">
<div class="panel-layout capricorn pane-bundle-cta-multiple">
  <div class="panel-pane pane-fieldable-panels-pane pane-vid-10729 d-sponsor pane-bundle-cta pane-fpid-422">
   <div class="pane-content">
    <div class="fieldable-panels-pane pane-style-full nographic pane-style-supporter">
     <div class="pane-title pane-bundle-cta-multiple">
       <h3>Need another Extra Block Type?</h3>

       <a class="button-link" target="_blank" href="http://drupalbook.org/contact" title="DrupalBook">Contact Us</a>

       <a href="http://drupalbook.org/contact" title="DrupalBook"  target="_blank"><img src="/files/logo.svg__1.png" alt="DrupalBook logo" width="85" /></a>
     </div>
   </div>
   </div>
  </div>
</div>
</div>
Now we have Drupal module project page on Drupal.org:
https://www.drupal.org/project/ebt_countdown
On Version Control tab you can see instructions how to add remote origin for you local git repository:
https://www.drupal.org/project/ebt_countdown/git-instructions
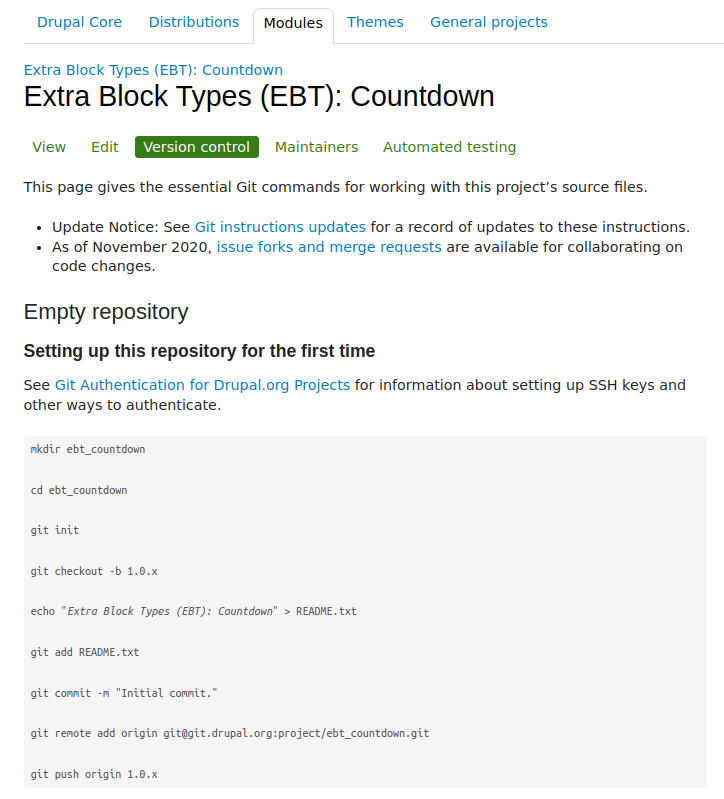
After initial commit you should create a new branch to follow major version of other EBT modules, now it's 1.4.x.
Now we can start to add new functionality for our module. The process is similar with custom module development, we will create block type, add fields, include css/js assets.
Start building EBT Countdown functionality
Step 1. Creating EBT Countdown block type. Just install module if you generated it with Drush.
Start building EBT Countdown functionality
Step 1. Creating EBT Countdown block type. Just install module if you generated it with Drush.
Just install module if you generated it with Drush.
First of all, we need to create a new block type EBT Countdown:
/admin/structure/block/block-content/types/add
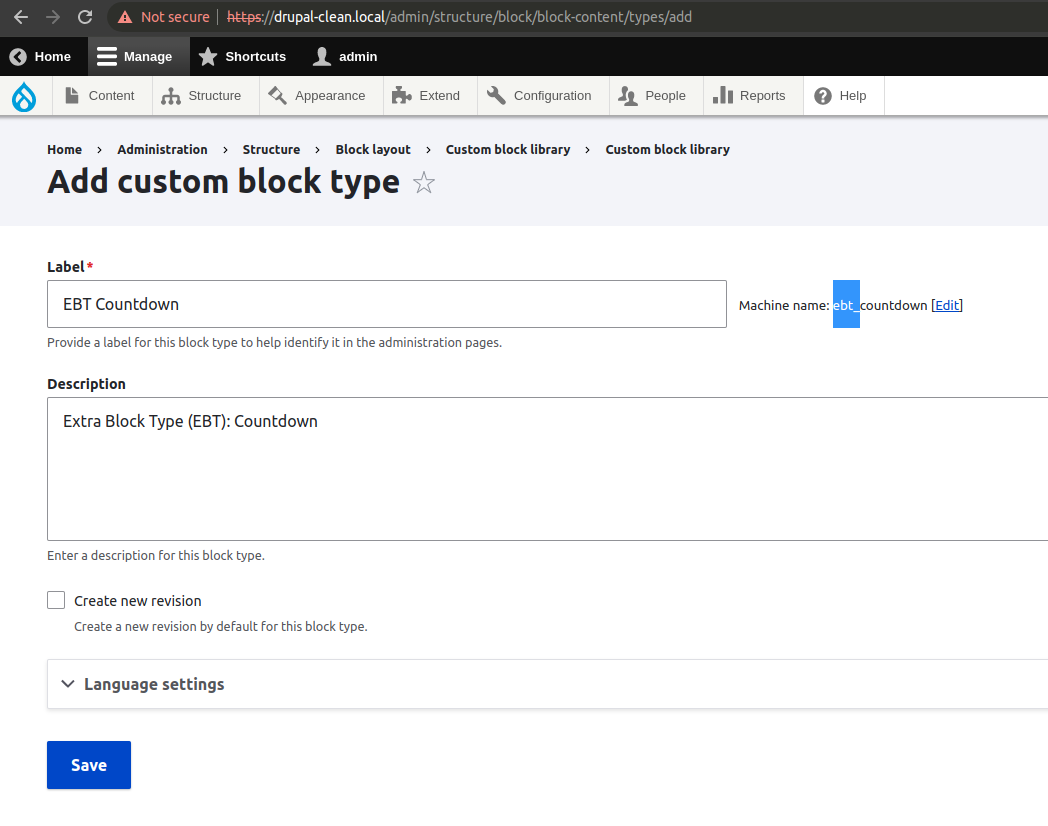
It's required that machine name starts from ebt_, so usually I name block types starts from EBT, then machine name is automatically being generated in right way. Should block type machine name match to module name? Yes, it's good to have for consistancy and be sure that another EBT module didn't have the same machine name. Block type machine name must start from ebt_, becuase it's needed to override templates in modules instead of theme folder, see ebt_core_theme_registry_alter() function in ebt_core module.
Now we can add EBT settings field, it's needed for all EBT modules. We should add existing field EBT Settings: field_ebt_settings:
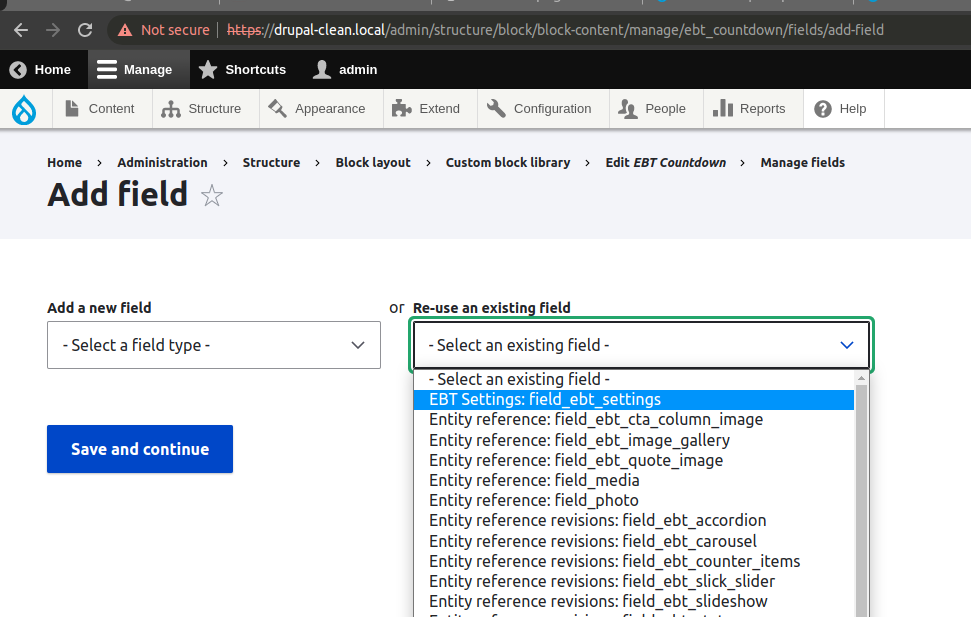
EBT Settings is common field from EBT Core module, it provides DOM Box, background, spacing and width settings.
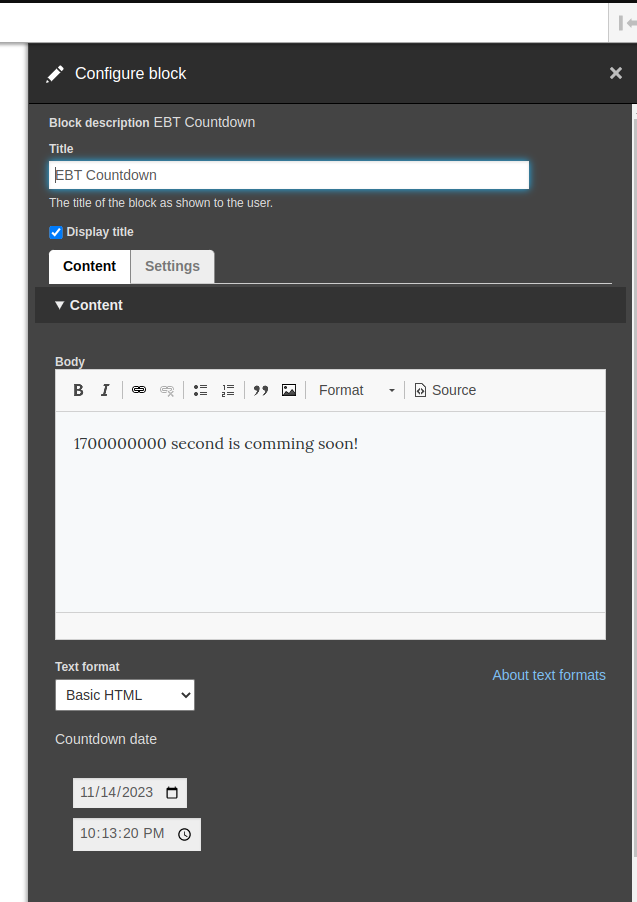
As we need countdown to the date, we should have timestamp date field. Let's add it too:
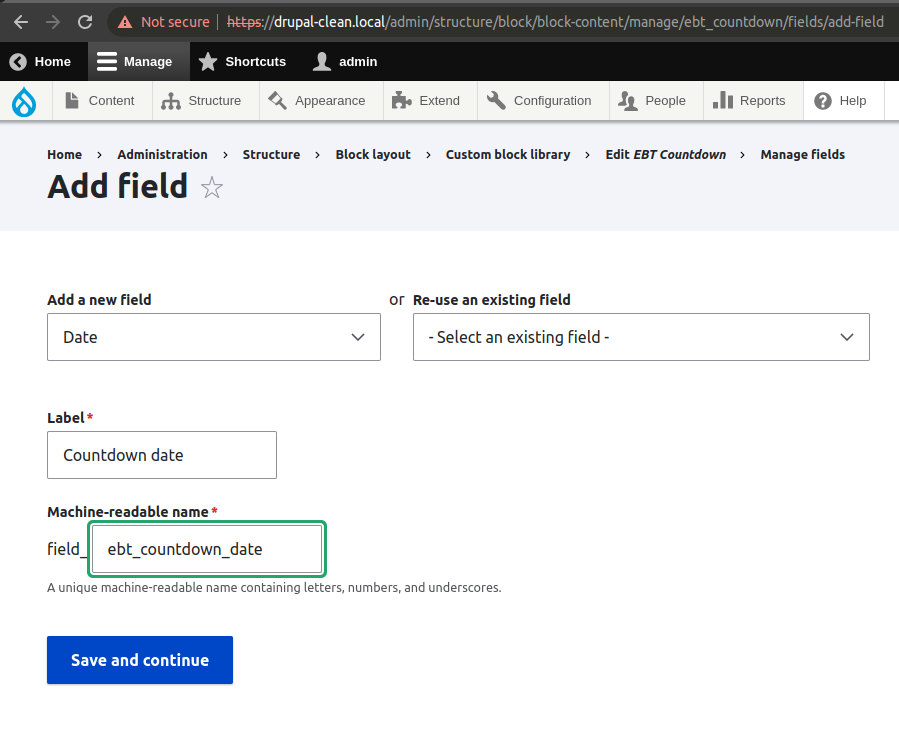
I added ebt_ for machine-readable name, but it's not required here. It can be field_countdown_date as well. We also have default body and title field for block, so it will be enough for countdown block.
Usually for EBT modules we have horizontal tabs on Edit form:
It's not required, but it's good to split content and settings, because we have a lot of settings for blocks.
Parent field group should be Tabs with settings Direction Horizontal, and Width Breakpoint 120 (or any small number):

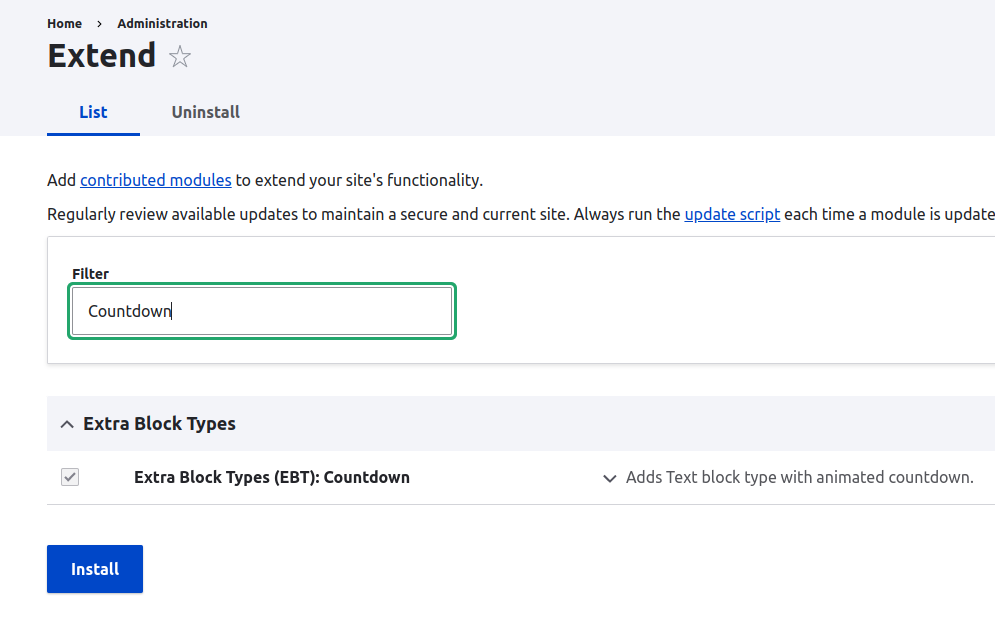
Now we can block type, let's enable EBT Countdown module, so templates for block type will be applied:
/admin/modules
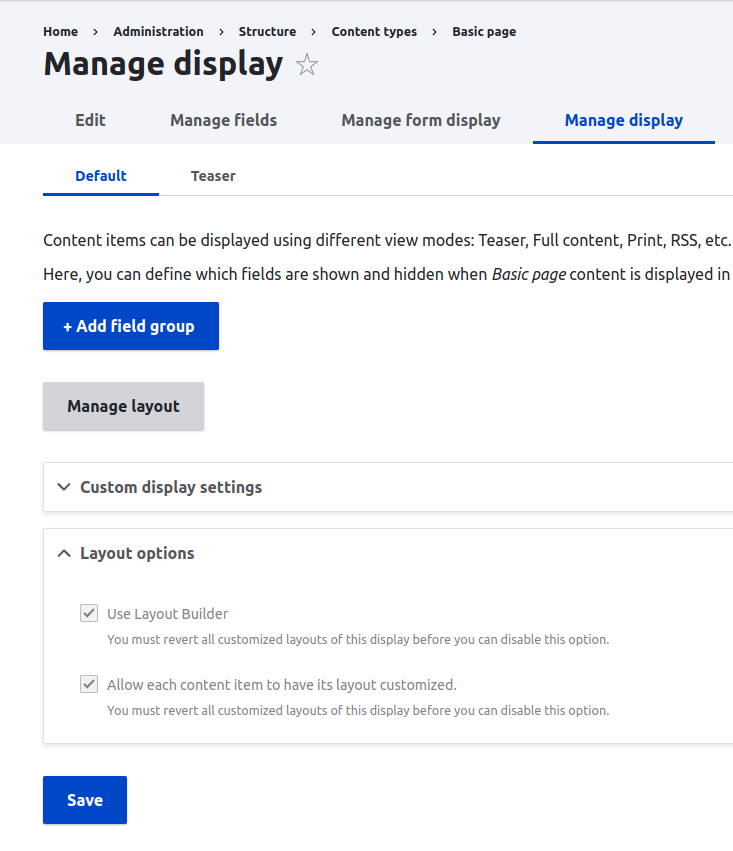
Also you will need to enable Layout Builder module and enable layout builder for any content type for example for Basic Page.
/admin/structure/types/manage/page/display
When you create a new Page, you will be able to add blocks on page Layout.
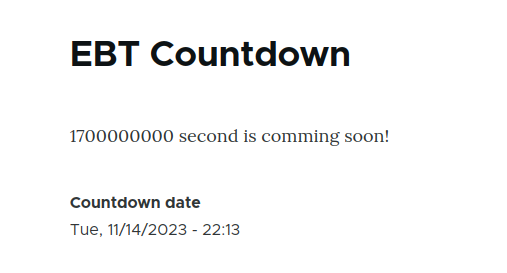
And what we have on the page:
Step 2. Include 3rd party libraries to EBT modules
Step 2. Include 3rd party libraries to EBT modules
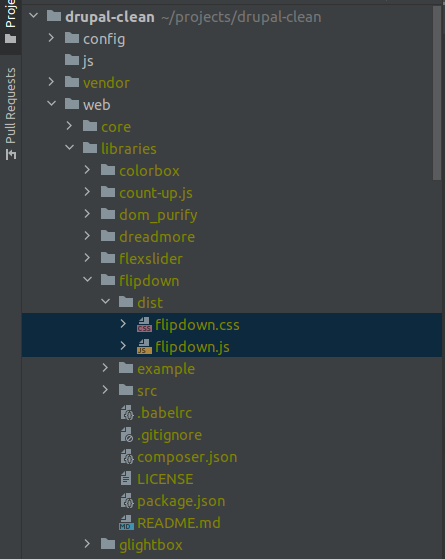
Now we can include our 3rd party library. We have levmyshkin/flipdown library in composer.json, but we have this new module as custom module, so we need to install this library manually with composer:
composer require levmyshkin/flipdown
New library should be placed in libraries folder automatically:
Let's add ebt_countdown.libraries.yml file and include there flipdown css/js and javascript file ebt_flipdown/js/ebt_countdown.js where later we will init flipdown plugin:
ebt_countdown.libraries.yml
ebt_countdown:
  css:
    component:
      /libraries/flipdown/dist/flipdown.min.css: { minified: true }
  js:
    /libraries/flipdown/dist/flipdown.min.js: { minified: true }
    js/ebt_countdown.js: {}
For files in /libraries folder we use slash at the beginning, so it's absolute path.
js/ebt_countdown.js:
(function ($, Drupal) {

  /**
   * EBT Countdown behavior.
   */
  Drupal.behaviors.ebtCountDown = {
    attach: function (context, settings) {

    };
  }

})(jQuery, Drupal);
And we should include new ebt_countdown library in temlates, don't forget what we have two templates:
{{ attach_library('ebt_countdown/ebt_countdown') }}

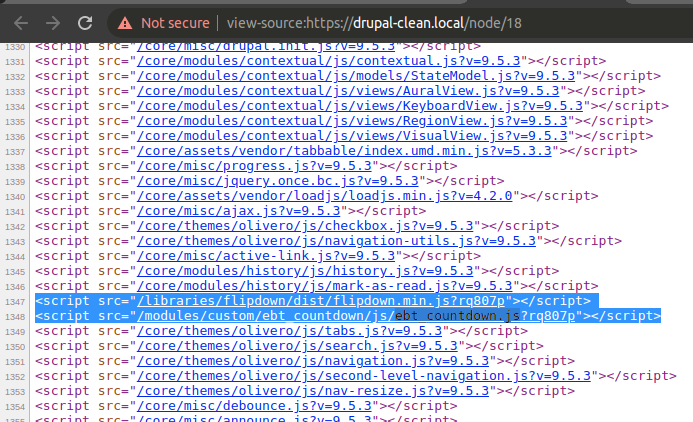
Clear caches and check that your javascript files on the page:
We will pass date from PHP to javascript in drupalSettings. So we should extend our ebt_countdown.libraries.yml file with dependencies. Also we will use once() function:
  dependencies:
    - core/once
    - core/drupalSettings
Step 3. Include own field widget for EBT Settings, pass variables to javascript
Step 3. Include own field widget for EBT Settings, pass variables to javascript
In EBT modules settings are not being passed to javascript by default. We need to override field widget class EbtSettingsDefaultWidget:
ebt_countdown/src/Plugin/Field/FieldWidget/EbtSettingsCountDownWidget.php:
<?php

namespace Drupal\ebt_countdown\Plugin\Field\FieldWidget;

use Drupal\Core\Field\FieldItemListInterface;
use Drupal\Core\Form\FormStateInterface;
use Drupal\ebt_core\Plugin\Field\FieldWidget\EbtSettingsDefaultWidget;

/**
 * Plugin implementation of the 'ebt_settings_countdown' widget.
 *
 * @FieldWidget(
 *   id = "ebt_settings_countdown",
 *   label = @Translation("EBT Countdown settings"),
 *   field_types = {
 *     "ebt_settings"
 *   }
 * )
 */
class EbtSettingsCountDownWidget extends EbtSettingsDefaultWidget {

  /**
   * {@inheritdoc}
   */
  public function formElement(FieldItemListInterface $items, $delta, array $element, array &$form, FormStateInterface $form_state) {
    $element = parent::formElement($items, $delta, $element, $form, $form_state);

    $element['ebt_settings']['pass_options_to_javascript'] = [
      '#type' => 'hidden',
      '#value' => TRUE,
    ];

    return $element;
  }

  /**
   * {@inheritdoc}
   */
  public function massageFormValues(array $values, array $form, FormStateInterface $form_state) {
    foreach ($values as &$value) {
      $value += ['ebt_settings' => []];
    }
    return $values;
  }

}
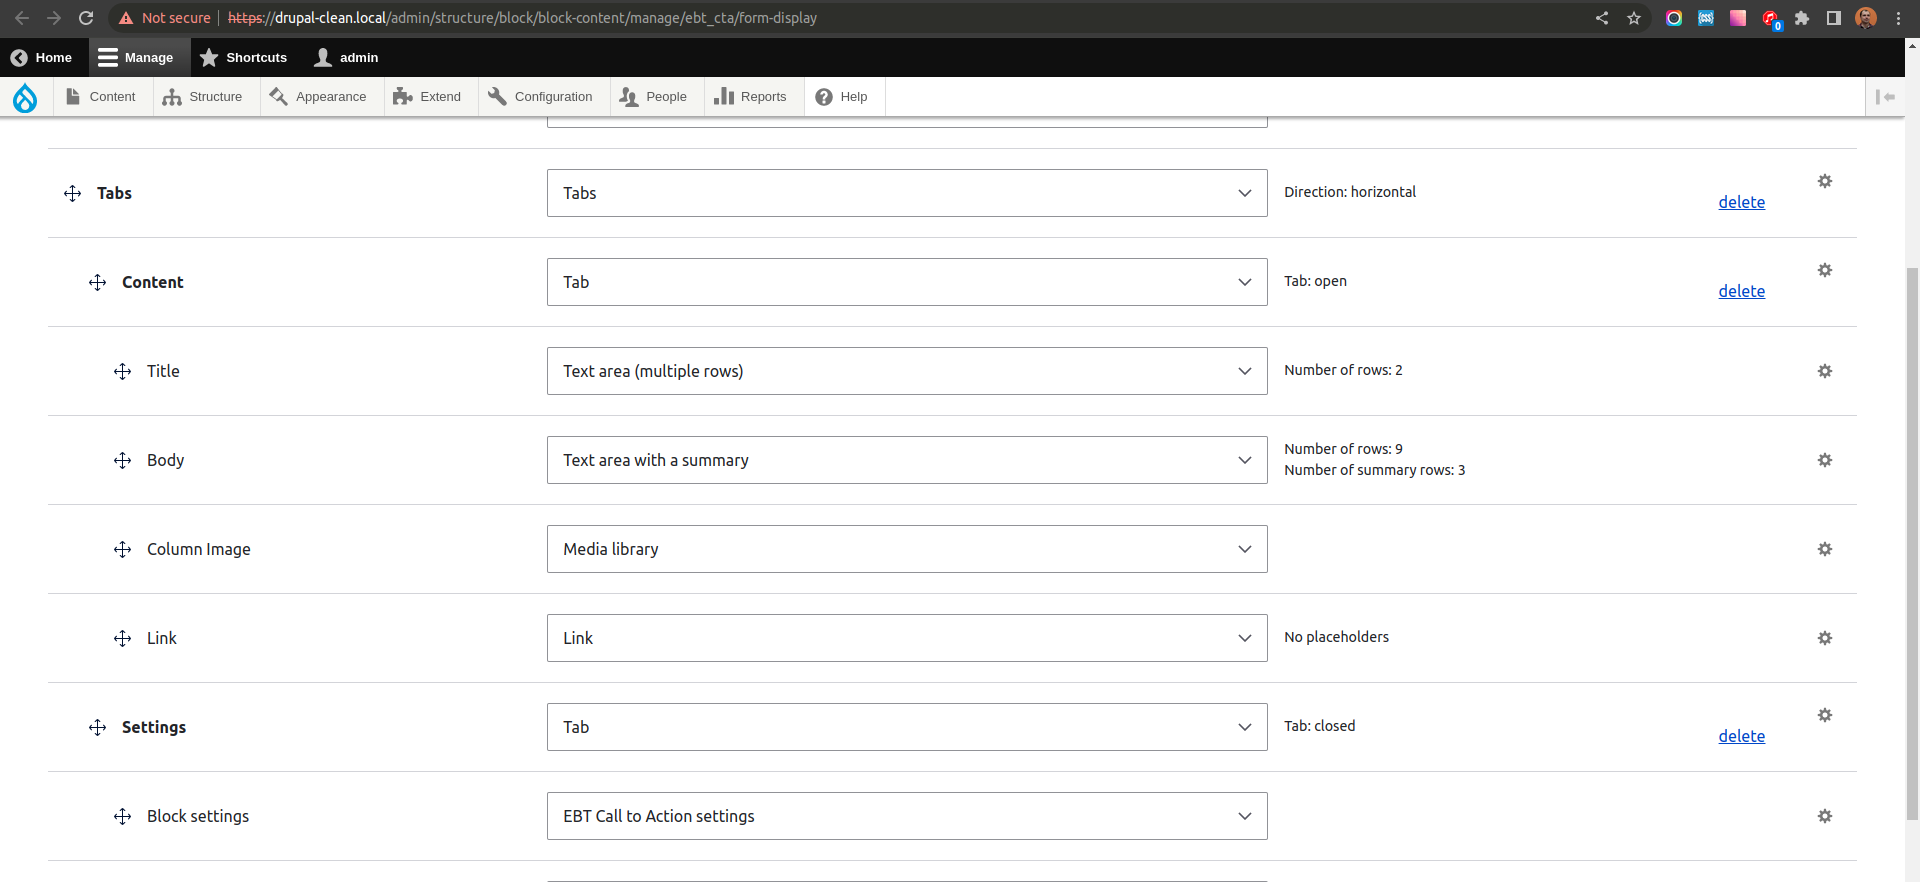
Now we can select this field widget for EBT Settings field:
/admin/structure/block/block-content/manage/ebt_countdown/form-display

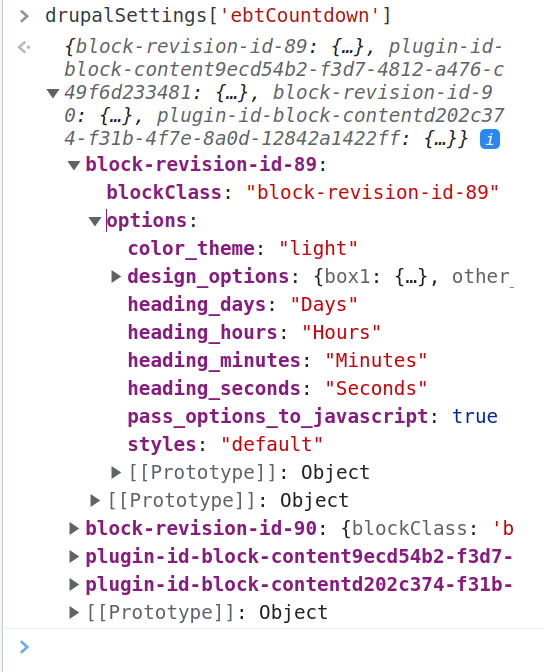
Let's resave our block and check drupalSettings javascript variable. Now all options from EBT Settings field will be passed in javascript:
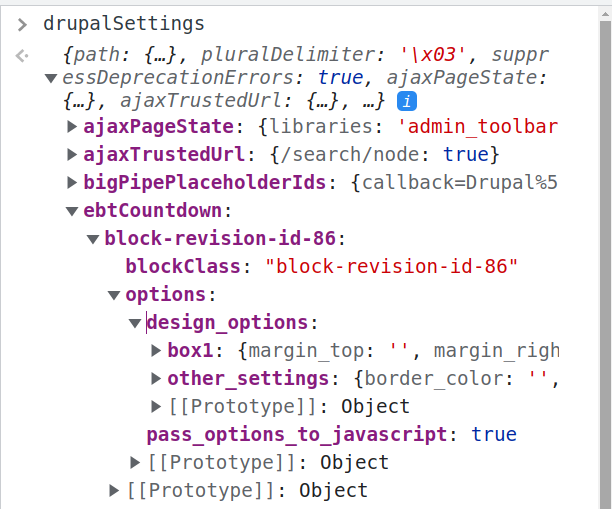
At the end of block-revision-id-* we have Block revision ID, so we have unique keys for all blocks. For inline blocks we use plugin ID plugin-id-block-contentd202c374-f31b-4f7e-8a0d-12842a1422ff. So we have unique IDs in Layout Builder.
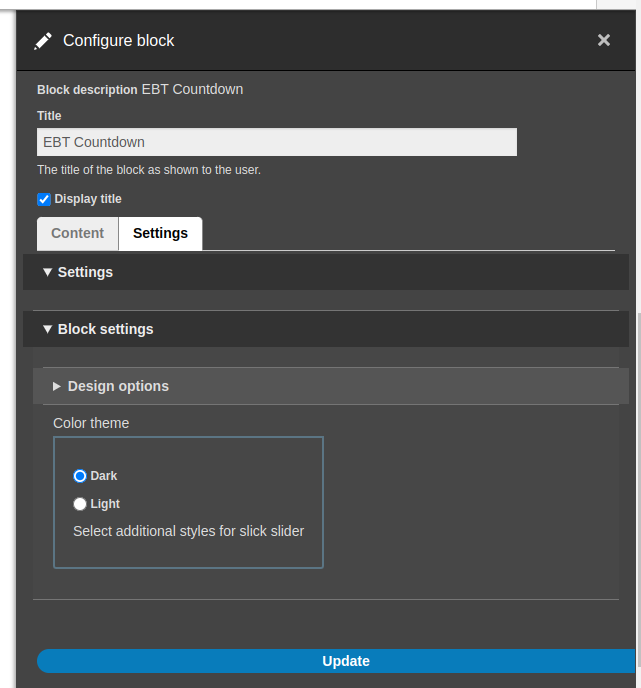
FlipDown plugin has option for light/dark theme, so let's pass this setting field in our field widget EbtSettingsCountDownWidget:
    $element['ebt_settings']['color_theme'] = [
      '#title' => $this->t('Color theme'),
      '#type' => 'radios',
      '#options' => [
        'dark' => $this->t('Dark'),
        'light' => $this->t('Light'),
      ],
      '#default_value' => $items[$delta]->ebt_settings['color_theme'] ?? 'dark',
      '#description' => $this->t('Select color theme for countdown'),
      '#weight' => '3',
    ];
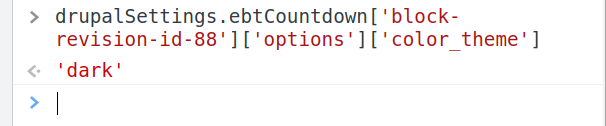
Then we can get theme color value in javascript:
Step 4. Initialize FlipDown plugin for EBT Countdown block
Step 4. Initialize FlipDown plugin for EBT Countdown block
We passed variables from settings to javascript, but we need to pass also Date value from content to javascript. We will create empty div with attribute data-date="", where we will place date and time from Date field. For inline-block (blocks in Layout Builder) we will use block_revision_id to define unique ID for block:
block--inline-block--ebt-countdown.html.twig:
    <div
      class="ebt-countdown-date ebt-countdown-inline-block flipdown"
      id="block-id-{{ configuration.block_revision_id }}"
      data-date="{{ content.field_ebt_countdown_date[0]['#attributes']['datetime']|date('U') }}">
    </div>

For content blocks from Block Layout page we will use plugin_id:
block--block-content--ebt-countdown.html.twig:
    <div
      class="ebt-countdown-date ebt-countdown-block-content flipdown"
      id="block-id-{{ plugin_id|clean_class }}"
      data-date="{{ content.field_ebt_countdown_date[0]['#attributes']['datetime']|date('U') }}">
    </div>

If you are not sure about where field data is, you can install Twig Debugger module and print content.field_ebt_countdown_date on the page {{ dump(content.field_ebt_countdown_date) }}:
https://www.drupal.org/project/twig_debugger
And we used date('U') twig filter to transform date to timestamp.
Now we can include custom javascript and initialize FlipDown.
/ebt_countdown/js/ebt_countdown.js:
(function ($, Drupal) {

  /**
   * EBT Countdown behavior.
   */
  Drupal.behaviors.ebtCountDown = {
    attach: function (context, settings) {
      var countdowns = once('ebt-countdown-block', '.ebt-countdown-date', context);
      countdowns.forEach(function(countdown) {
        var countdownTimestamp = parseInt(countdown.getAttribute('data-date'));
        var countdownId = countdown.getAttribute('id');
        new FlipDown(countdownTimestamp, countdownId, {
          theme: "dark",
        }).start();
      });
    }
  }

})(jQuery, Drupal);
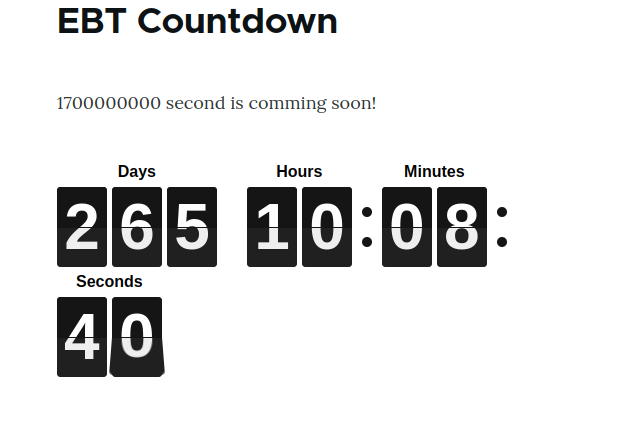
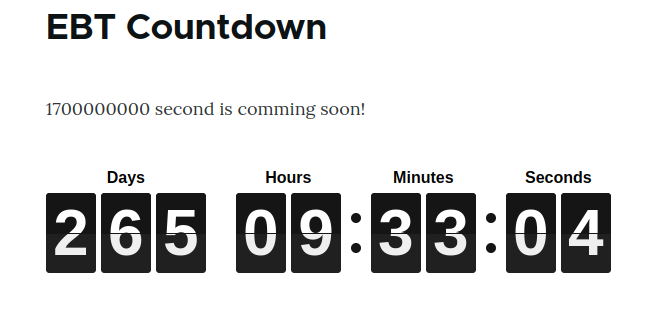
Don't forget to clear caches to see updates. After that FlipDown should be working on the page:
Step 5. Styling new EBT Countdown block. Gulp.js file is included for drush generated EBT module.
Step 5. Styling new EBT Countdown block. Gulp.js file is included for drush generated EBT module.
As you see even default FlipDown styles are not working great. There are two lines of numbers even on desktop. But we can easily fix it with custom styles. You can copy gulpfile.js and package.json files for compiling scss to css from EBT Counter module:
https://www.drupal.org/project/ebt_counter
gulpfile.js:
// --------------------------------------------------
// Load Plugins
// --------------------------------------------------

var gulp = require('gulp'),
    sass = require('gulp-dart-scss'),
    postcss = require("gulp-postcss"),
    autoprefixer = require("autoprefixer"),
    cssnano = require("cssnano"),
    notify = require('gulp-notify'),
    sassUnicode = require('gulp-sass-unicode');


var config = {
    // main scss files that import partials
    scssSrc: 'scss/*.scss',
    // all scss files in the scss directory
    allScss: 'scss/**/*.scss',
    // the destination directory for our css
    cssDest: 'css/',
    // all js files the js directory
    allJs: 'assets/js/**/*.js',
    // all img files
    allImgs: 'assets/img/**/*'
};


// Define tasks after requiring dependencies
function style() {

  return gulp.src(config.allScss)
    .pipe(sass())
    .pipe(sassUnicode())
    .pipe(postcss([autoprefixer()]))
    .pipe(gulp.dest(config.cssDest));

  gulp.task('sass:watch', function () {
    gulp.watch('./scss/**/*.scss', ['sass']);
  });
}

// Expose the task by exporting it
// This allows you to run it from the commandline using
// $ gulp style
exports.style = style;

function watch(){
    // gulp.watch takes in the location of the files to watch for changes
    // and the name of the function we want to run on change
    gulp.watch('scss/**/*.scss', style)
}

// Don't forget to expose the task!
exports.watch = watch
package.json:
{
  "name": "ebt_styles",
  "version": "1.0.0",
  "description": "Run npm install and then gulp watch",
  "main": "gulpfile.js",
  "scripts": {
    "test": "echo \"Error: no test specified\" && exit 1"
  },
  "author": "",
  "license": "ISC",
  "devDependencies": {
    "autoprefixer": "^10.2.5",
    "cssnano": "^5.0.2",
    "gulp": "^4.0.2",
    "gulp-dart-scss": "^1.1.0",
    "gulp-notify": "^4.0.0",
    "gulp-postcss": "^9.0.0",
    "gulp-sass-unicode": "^1.0.5",
    "gulp-sourcemaps": "^3.0.0"
  },
  "dependencies": {
    "cucumber": "*",
    "postcss": "^8.2.13"
  }
}
package-lock.json file will be generated after you run:
npm install
And you can start gulp task with:
gulp watch
Now we will add scss files:
/ebt_countdown/scss/flipdown.scss
.flipdown {
  width: 580px;
}
So flipdown.css file will be automatically generated from flipdown.scss. And we can include .css file in .libraries.yml:
ebt_countdown:
  css:
    component:
      /libraries/flipdown/dist/flipdown.min.css: { minified: true }
      css/flipdown.css: { }
Let's clear cache and see results:
Now it looks better!
Can we use plain css without compiling from scss?
Yes, we can, but writing scss is more convient for the most developers.
Step 6. Extend settings form with FlipDown plugin options
Step 6. Extend settings form with FlipDown plugin options
FlipDown plugin has few options to change display:
https://github.com/PButcher/flipdown
- theme
- headings
We already created new field widget for EBT Settings EbtSettingsCountDownWidget, now we will extend this form with new fields:
/ebt_countdown/src/Plugin/Field/FieldWidget/EbtSettingsCountDownWidget.php:
    $element['ebt_settings']['color_theme'] = [
      '#title' => $this->t('Color theme'),
      '#type' => 'radios',
      '#options' => [
        'dark' => $this->t('Dark'),
        'light' => $this->t('Light'),
      ],
      '#default_value' => $items[$delta]->ebt_settings['color_theme'] ?? 'dark',
      '#description' => $this->t('Select color theme for countdown'),
      '#weight' => '3',
    ];

    $element['ebt_settings']['styles'] = [
      '#title' => $this->t('Styles'),
      '#type' => 'radios',
      '#options' => [
        'default' => $this->t('Default'),
        'new_year' => $this->t('New Year'),
      ],
      '#default_value' => $items[$delta]->ebt_settings['styles'] ?? 'default',
      '#description' => $this->t('Select special style for countdown'),
      '#weight' => '4',
    ];

    $element['ebt_settings']['heading_days'] = [
      '#title' => $this->t('Heading Days'),
      '#type' => 'textfield',
      '#default_value' => $items[$delta]->ebt_settings['heading_days'] ?? $this->t('Days'),
      '#description' => $this->t('Header for Days counter'),
      '#weight' => '5',
    ];

    $element['ebt_settings']['heading_hours'] = [
      '#title' => $this->t('Heading Hours'),
      '#type' => 'textfield',
      '#default_value' => $items[$delta]->ebt_settings['heading_hours'] ?? $this->t('Hours'),
      '#description' => $this->t('Header for Hours counter'),
      '#weight' => '6',
    ];

    $element['ebt_settings']['heading_minutes'] = [
      '#title' => $this->t('Heading Minutes'),
      '#type' => 'textfield',
      '#default_value' => $items[$delta]->ebt_settings['heading_minutes'] ?? $this->t('Minutes'),
      '#description' => $this->t('Header for Minutes counter'),
      '#weight' => '7',
    ];

    $element['ebt_settings']['heading_seconds'] = [
      '#title' => $this->t('Heading Seconds'),
      '#type' => 'textfield',
      '#default_value' => $items[$delta]->ebt_settings['heading_seconds'] ?? $this->t('Seconds'),
      '#description' => $this->t('Header for Seconds counter'),
      '#weight' => '8',
    ];

    return $element;
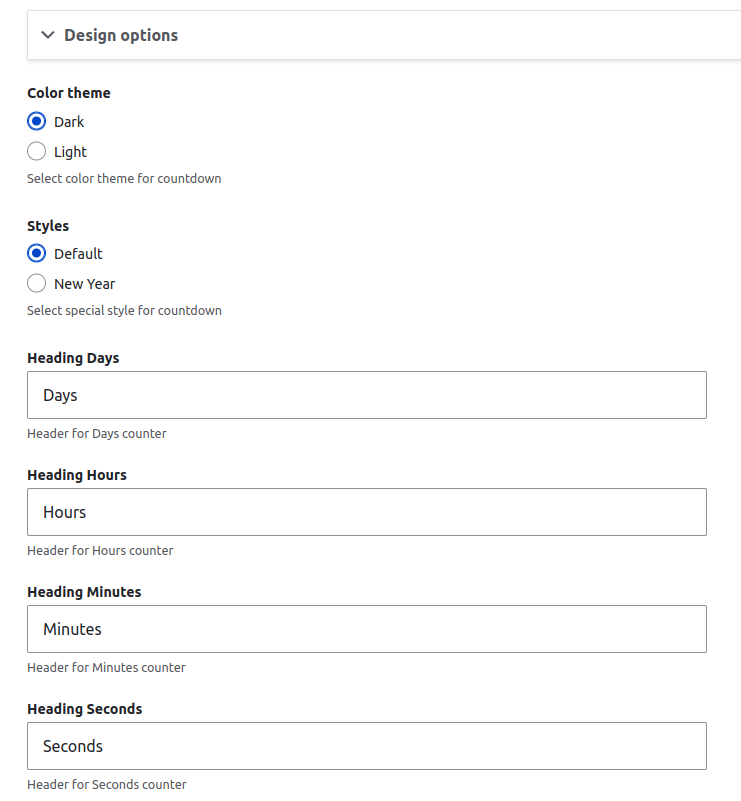
So we can use Headings for translations:
We have all EBT settings values in javascript, so I just added ID in template for easier getting right unique key.
.setAttribute('id', 'plugin-id-' ~ plugin_id|clean_class)
.setAttribute('id', 'block-revision-id-' ~ configuration.block_revision_id)
Options keys have pattern the same with IDs:
/ebt_core/ebt_core.module:
  // Use plugin_id for Block content.
  $build['#attached']['drupalSettings'][$bundle]['block-revision-id-' . $revision_id[0]['value']] = $block_options;
  $uuid = $entity->get('uuid')->getValue();
  $block_options = [
    'blockClass' => 'plugin-id-block-content' . $uuid[0]['value'],
    'options' => $options,
  ];
  $build['#attached']['drupalSettings'][$bundle]['plugin-id-block-content' . $uuid[0]['value']] = $block_options;
So we could use options from javascript drupalSettings:
/ebt_countdown/js/ebt_countdown.js:
(function ($, Drupal) {

  /**
   * EBT Countdown behavior.
   */
  Drupal.behaviors.ebtCountDown = {
    attach: function (context, settings) {
      var countdowns = once('ebt-countdown-block', '.ebt-countdown-date', context);
      countdowns.forEach(function(countdown) {
        // Get block ID.
        var countdownWrapper = countdown.closest('.ebt-block-countdown');
        var countdownWrapperId = countdownWrapper.getAttribute('id');
        // Get block EBT settings.
        var ebtOptions = drupalSettings['ebtCountdown'][countdownWrapperId];
        // Prepare options for javascript plugin.
        var countdownTimestamp = parseInt(countdown.getAttribute('data-date'));
        var countdownId = countdown.getAttribute('id');
        // Init javascript plugin.
        new FlipDown(countdownTimestamp, countdownId, {
          theme: ebtOptions['options']['color_theme'],
          headings: [
            ebtOptions['options']['heading_days'],
            ebtOptions['options']['heading_hours'],
            ebtOptions['options']['heading_minutes'],
            ebtOptions['options']['heading_seconds'],
          ],
        }).start();
      });
    }
  }

})(jQuery, Drupal);
I also added $element['ebt_settings']['styles'] in field widget, so we will use it in template for adding new class for entire block.
{%
  set classes = [
  'block',
  'ebt-block',
  'ebt-block-countdown',
  'ebt-block-' ~ plugin_id|clean_class,
  'block-' ~ configuration.provider|clean_class,
  'block-' ~ plugin_id|clean_class,
  'plugin-id-' ~ plugin_id|clean_class,
  content.field_ebt_settings['#object'].field_ebt_settings.ebt_settings.styles,
]
%}
{% if content.field_ebt_settings['#object'].field_ebt_settings.ebt_settings.styles == 'new_year' %}
  {{ attach_library('ebt_countdown/new_year') }}
{% endif %}
It will include new_year library for New Year style, but now we need to create this library.
/ebt_countdown/ebt_countdown.libraries.yml:
new_year:
  css:
    component:
      css/new-year.css: { }
And here is styles for new-year block:
/ebt_countdown/scss/new-year.scss
/ebt_countdown/css/new-year.css
.ebt-block-countdown.new_year {
  background: url(../img/snowflakes.webp) center center repeat;
}
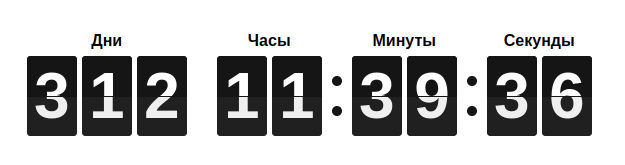
Here is result of adding new style:

You can add any number of styles for new or existing EBT modules. You can also suggest own styles for any EBT module, just create issue on drupal.org for it:
Step 7. Export configs for EBT block type, paragraph type and fields
Step 7. Export configs for EBT block type, paragraph type and fields
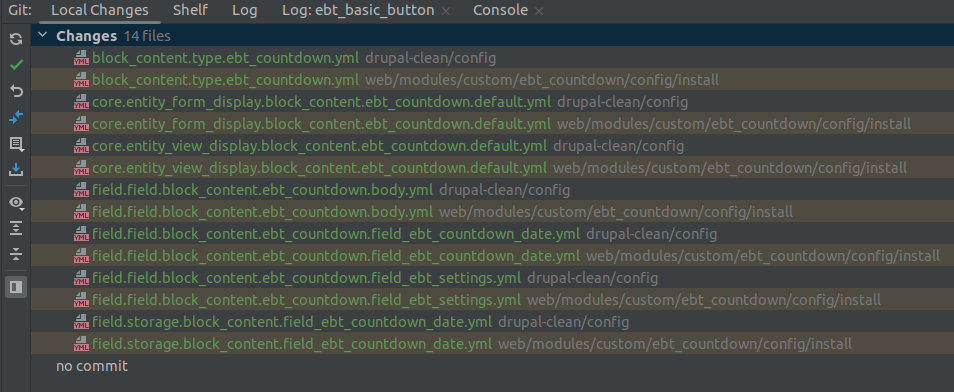
I think we finished with adding features to EBT Countdown, it's time to export configs and deploy changes on Drupal.org. We should copy all configs related to EBT Countdown to /ebt_countdown/config/install folder.
If you generated EBT module with Drush, you need to update configs for new fields and your EBT block type.
After that enable EBT module on Extend page /admin/modules. New EBT block type and other settings will be installed from /config/install folder from config files:
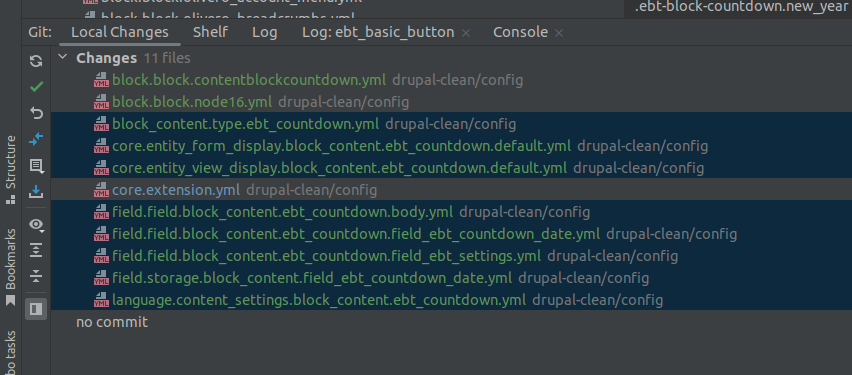
We don't need to add language.* configs, because some drupal sites have only one language and Language module can be disabled.
Usually I copy all files and checking that I have copy in config/install folder.
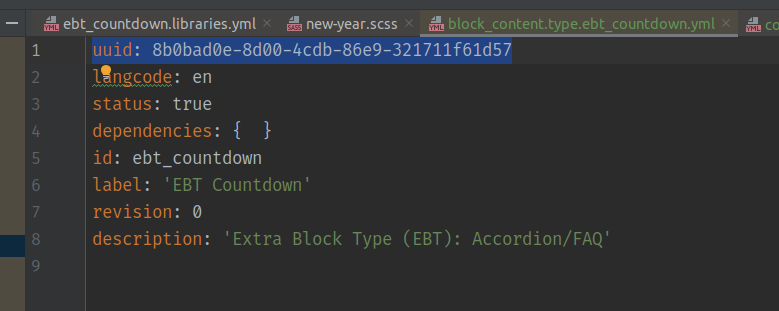
Now we need to remove uuid and hashes from configs in config/install folder
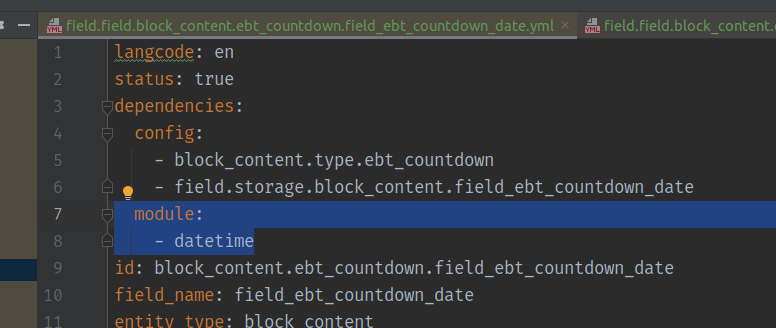
As we used another Drupal modules we should include them in .info file as dependencies.
/ebt_countdown/ebt_countdown.info:
dependencies:
  - drupal:datetime
Step 8. Deploy on Drupal.org and testing
Step 8. Deploy on Drupal.org and testing
We created new project on Drupal.org before:
https://www.drupal.org/project/ebt_countdown
I will use 1.4.x branch as main branch, for consistancy with other EBT modules:
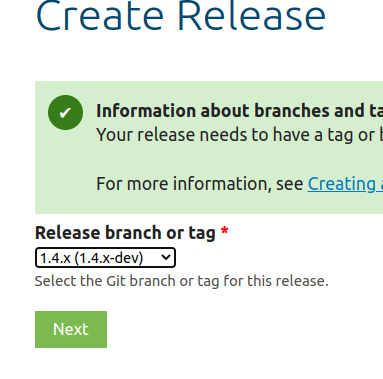
So all releases will be started from 1.4.0 versions:
git tag 1.4.0
git push origin 1.4.0
You can also create -alpha, -beta version before creating stable 1.4.0 version.
We need to wait 10 days before module can be opted into security advisory coverage.
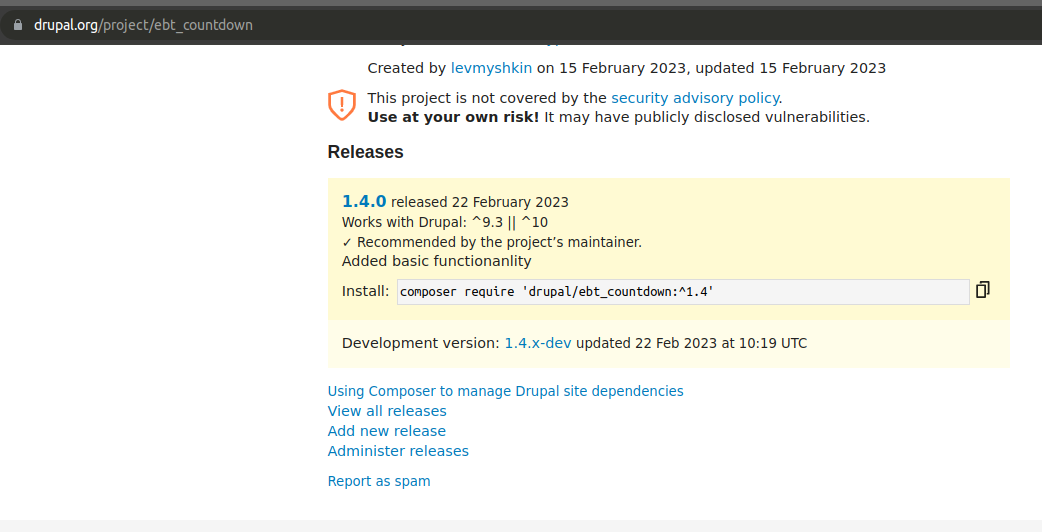
So we can test our new module and fix bugs.
Step 9. Add README.md file
Step 9. Add README.md file
Don't forget to add README.md file, you can see example in other EBT modules:
https://www.drupal.org/project/ebt_slideshow
Thank you for using EBT modules! Feel free to ask or suggest any ideas: