How to Use the Webform REST Module with Drupal 11: A Practical Guide
In the ever-evolving landscape of web development, Drupal 11 stands out as one of the most robust and flexible platforms for building dynamic websites and applications. Its modular architecture empowers developers to tailor and extend core functionalities to meet a wide range of project needs.
One such extension is the Webform REST module, a powerful tool that enables seamless integration between Drupal and external applications via RESTful APIs. This guide offers a practical introduction to using the Webform REST module with Drupal 11, walking through its setup and configuration, and demonstrating how to interact with it effectively.
What You’ll Learn
This article covers the following topics:
-
Overview of the Webform REST module
-
Required modules and dependencies
-
Installing Webform REST and REST UI
-
Configuring the Webform REST module
-
Handling CORS
-
Making API requests
-
Understanding request and response payloads
Module Overview: Webform REST
The Webform REST module extends Drupal’s Webform capabilities by exposing form-related functionality via RESTful endpoints. With it, you can perform operations like creating, viewing, updating, and deleting web forms, as well as submitting and retrieving form data through HTTP requests.
This module is especially useful for integrating Drupal with external platforms such as:
-
CRM systems
-
Email marketing tools
-
Mobile applications
-
Third-party services
By enabling these integrations, you can streamline workflows and centralize data collection, significantly enhancing the overall efficiency of your application.
Prerequisites
To get started with Webform REST, make sure you have the following modules installed:
-
Webform – for building and managing web forms
-
REST UI – for configuring RESTful endpoints and permissions
-
Webform REST – the main module providing the API functionality
Installing Webform REST and Dependencies
In this guide, we’re using Docker and Lando for managing the local development environment and using Composer for dependency management.
To install the Webform REST module, run the following command:
$ lando composer require 'drupal/webform_rest:^4.0'
To enable the module:
$ lando drush en webform_rest
Additionally, enable the REST UI module, which allows you to configure REST endpoints through the admin interface:
$ lando drush en restui
Alternatively, you can activate these modules via the admin interface:
/admin/modules
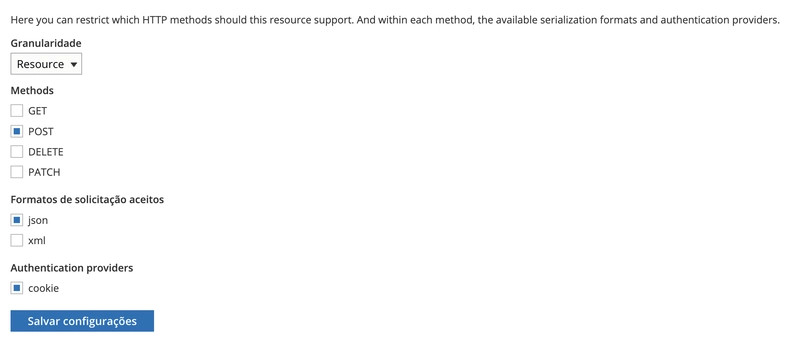
Configuring the Webform REST Module
Once the required modules are enabled, navigate to the REST configuration page:
Path: /admin/config/services/rest
Enable the following REST resources:
-
Webform Submission
-
Webform Elements
-
Webform Submit
These resources provide the essential endpoints for interacting with forms and their data via REST.
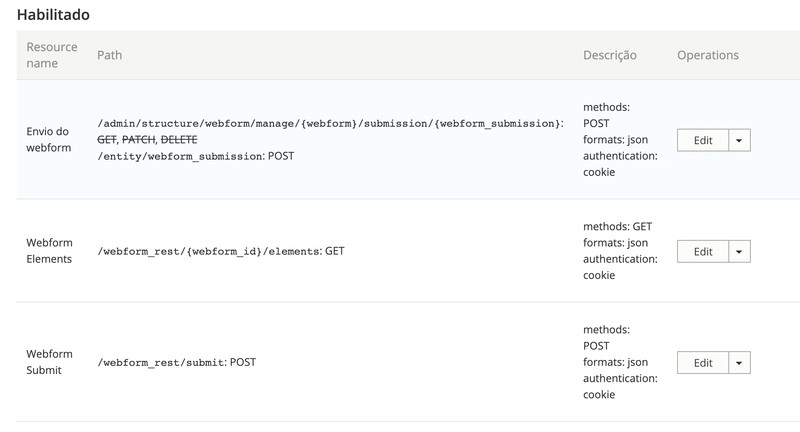
It is necessary to select at least one authentication method, in our case, "cookie".
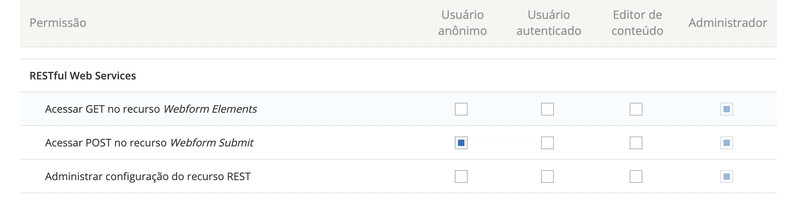
To enable unauthenticated users to submit requests via the web form, you must grant the appropriate permissions to the Anonymous user role. Specifically, allow them to make POST requests to the Webform Submit REST resource.
This permission can be configured by navigating to:
/admin/people/permissions
Under the “RESTful Web Services” section, check the box for “Access POST on Webform Submit resource” for the Anonymous user. This ensures that external users or systems without authentication can successfully submit data to your Drupal site through the Webform REST API.
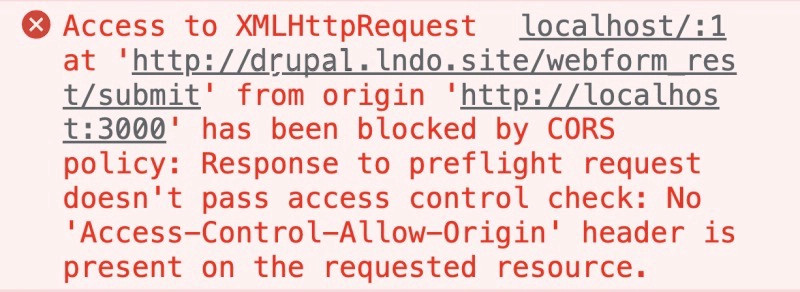
A word about CORS
If you intend to make requests from a different domain than your application's installation, you will likely encounter a CORS issue like this:
Understanding and Configuring CORS in Drupal 11
CORS (Cross-Origin Resource Sharing) is a critical security mechanism implemented by web browsers to control how resources are accessed across different origins—where an origin is defined as a combination of domain, protocol, and port.
In simple terms, CORS allows servers to specify which external domains are permitted to access specific resources via browser-based requests. Without a properly configured CORS policy, browsers fall back to the Same-Origin Policy, which blocks access to resources from any origin other than the one that served the web page.
Configuring CORS in Drupal 11
Drupal 11 manages CORS settings through the services.yml file, specifically under the cors.config section. By default, this configuration is disabled, which means cross-origin requests will be blocked unless explicitly allowed.
To enable CORS for external clients—such as JavaScript frontends or mobile apps—you’ll need to modify the configuration in your services.yml file. Here’s an example of a permissive setup for development or testing purposes:
cors.config:
    enabled: true
    allowedHeaders: ['x-csrf-token','authorization','content-type','accept','origin','x-requested-with', 'access-control-allow-origin','x-allowed-header','*']
    allowedMethods: ['*']
    allowedOrigins: ['*']
    exposedHeaders: false
    maxAge: false
    supportsCredentials: true
Configuring services.local.yml in Local Development
In most Drupal local development setups, you’ll have a file named services.local.yml. This file is specifically intended to override configurations from the main services.yml. Therefore, any changes you make to services.yml may be ignored if conflicting or incomplete settings exist in services.local.yml.
To ensure your CORS configuration is properly applied, make sure to replicate or modify the settings in services.local.yml accordingly.
Clear the Cache After Configuration
After updating your YAML configuration files, clear the Drupal cache to apply the changes:
$ lando drush cr
YAML Indentation Matters
Be meticulous with YAML indentation, as it’s a common source of configuration issues. Even a single misplaced space or tab can cause the settings to be ignored—leading to hours of unnecessary debugging. If your changes aren’t taking effect, double-check your indentation first.
Using the Webform REST Module
Once everything is configured, you can begin submitting forms via REST. The process involves sending a POST request to the Webform REST endpoint along with the required headers and payload.
Endpoint
POST /webform_rest/submit
Required Header
Content-Type: application/json
Example: Submitting a Form Using Axios
Here’s a sample Axios request in JavaScript for submitting form data:
 const response = await axios.post('http://yoursite.lndo.site/webform_rest/submit', {
    "webform_id": "some_rest_form",
    "name": "Ivan Abramenko",
    "email": "levmyshkin89@gmail.com",
  }, {
    headers: {
    "Content-Type": 'application/json',
    },
  });
This example demonstrates how to make a POST request using Axios, but you can use other HTTP libraries or frameworks to make the request as well.
The request payload consists primarily of the webform_id, which is the machine name of the target form, and its registered fields.
{
   "webform_id": "some_rest_form",
   "name": "Ivan Abramenko",
   "email": "levmyshkin89@gmail.com"
}
The response payload of a successful submission consists of the following fields:
sid, the unique identifier of the recorded submissionconfirmation_url, the submission confirmation URLconfirmation_message, the confirmation messageconfirmation_title, the title of the confirmation message
{
   "sid": "ae8c3bd4-91a2-5c17-a264-59c86157457b",
   "confirmation_type": "inline",
   "confirmation_url": "",
   "confirmation_message": "Just a confirmation message",
   "confirmation_title": "A confirmation title"
}
Additionally, we also have access to validation messages generated by Webform itself. For example, if a required field is not submitted, we receive the following response:
{
   "message": "Submitted Data contains validation errors.",
   "error": {
       "email": "The email field is mandatory."
   }
}
Handling the API Response
With the response data returned from the API, you can programmatically provide feedback to users—such as success confirmations, validation errors, or submission failures. Tailoring these responses enhances the user experience and ensures clarity during the interaction process.
Whether you're integrating the form with a frontend framework or a mobile app, managing the API response effectively is key to delivering a smooth and intuitive experience.
Wrapping Up
The Webform REST module for Drupal 11 offers a powerful and flexible solution for interacting with web forms via RESTful APIs. By enabling external applications to submit and manipulate form data, it significantly expands Drupal’s integration capabilities—making it ideal for modern web architectures that rely on decoupled or headless approaches.
In this article, we explored:
-
An introduction to the Webform REST module
-
Step-by-step installation and configuration
-
How to submit data through the API using a practical example
While this guide focused on form submission, the Webform REST module supports additional operations that were not covered here, including:
-
PATCH requests to update existing submissions
-
GET requests to retrieve submission data or list form fields
-
Additional customization for authentication and access control
These advanced use cases will be explored in future tutorials.