Creating Slideshows and jQuery Carousels in Drupal 7. Part 2
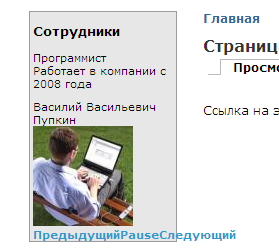
In the previous part of the tutorial, we created a slideshow. I used it to display company staff, but you might use it as a banner for your website header. However, the default solution doesn’t quite suit me—I’d like to add navigation buttons for previous and next slides. This looks much better than simple text or numeric controls.
Just to recap, we already have Views and Views_slideshow installed.
So, I’ve attached a few arrow icons to this article—let’s add them to our slideshow. First, we need to enable the text-based slide pager.

The pager should now switch to display "Next" and "Previous" text links.
The idea is to use CSS to set a background image for the "next" and "previous" links and position them accordingly using CSS.
To work effectively, you’ll need the Firebug extension for Firefox. It provides convenient CSS inspection tools. Here’s how the pager links appear in Firebug:
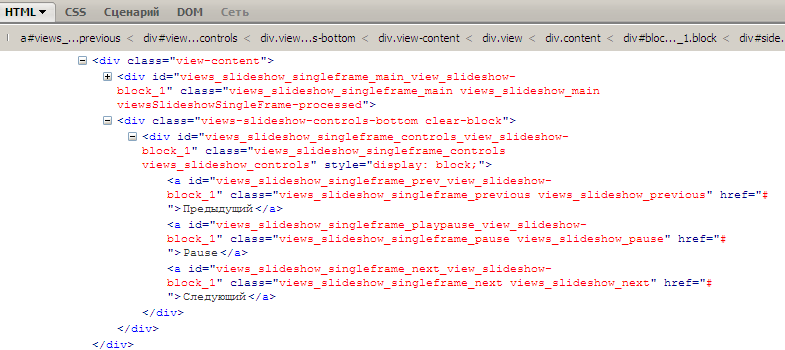
The id of each element is important—we’ll use it in our CSS rules. You’ll also need to place your arrow images in your theme’s images folder.
Now let’s update the CSS by adding to your theme’s style.css. The code might look something like this, but be sure to adjust values for your layout:
a#views_slideshow_singleframe_prev_view_slideshow-block_1 {
    background: url('images/left.png');
    width: 30px;
    height: 0px;
    padding-top: 30px;
    position: relative;
    top: 0px;
    overflow: hidden;
    z-index: 5;
    display: block;
}
a is the link tag, and # denotes an element with a matching id.
The CSS for the "next" button will be slightly different:
a#views_slideshow_singleframe_next_view_slideshow-block_1 {
    background: url('images/right.png');
    width: 30px;
    height: 0px;
    padding-top: 30px;
    position: relative;
    top: 0px;
    left: 30px;
    overflow: hidden;
    z-index: 5;
    display: block;
}
You can completely hide the "pause" link:
a#views_slideshow_singleframe_playpause_view_slideshow-block_1 {
    display: none;
}
Adjust padding and positioning using Firebug, then write the final values to style.css.
Here’s what my final CSS looks like:
#views_slideshow_singleframe_prev_view_slideshow-block_1 {
    background: url('images/left.png');
    width: 35px;
    height: 0px;
    padding-top: 26px;
    position: relative;
    top: -55px;
    overflow: hidden;
    z-index: 5;
    display: block;
}
#views_slideshow_singleframe_next_view_slideshow-block_1 {
    background: url('images/right.png');
    width: 35px;
    height: 0px;
    padding-top: 26px;
    position: relative;
    top: 0px;
    left: 0px;
    overflow: hidden;
    z-index: 5;
    display: block;
}
a#views_slideshow_singleframe_playpause_view_slideshow-block_1 {
    display: none;
}
#views_slideshow_singleframe_controls_view_slideshow-block_1 {
    height: 0px;
}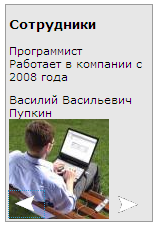
The banner is ready! In the next part of the tutorial, we’ll create a jQuery carousel.