Ubercart: Using Product kit to sell products in a bundle
We often see complementary products being sold together: a mobile phone with a charger, an MP3 player with headphones. Sometimes, there are even attempts to make us buy a microwave with our refrigerator. Ubercart allows you to sell not only individual products but also bundled products. These bundled products are often presented as special offers.
To sell products as a bundle, we need to activate the Ubercart submodule Product kit. You don't need to download it separately, as it is included in Ubercart.
Ubercart: Creating Product Attributes
Managing Attributes in Ubercart
In Ubercart, you can manage product attributes at two levels:
- Using store settings, you can create and configure default attributes with default values. If you have product groups that require different attributes, you can create different product classes.
- When a new product is created, default attributes are applied. You can then customize these attributes individually for each product.
Before creating attributes, you must enable the Ubercart Attributes submodule.
Ubercart delivery setup
So far, we have completed the basic configuration of Drupal and Ubercart, created categories and subcategories, and added several products. You now have a fantastic product catalog with impressive product descriptions, large images, and multiple attributes. Visitors to your store can browse through all these products, examine every detail, and absorb all the information. However, we cannot yet call this a true store—your visitors should not only be able to view products but also purchase them.
Where will we deliver the goods?
Shipping Country Configuration
Navigate to Admin | Store Management | Settings | Country and Address Settings.
In the country settings section, there are two tabs: Import Countries and Country Formats. The Import Countries tab allows you to choose the countries from which you intend to accept orders. By default, only the United States and Canada are enabled. The interface allows you to import new countries and disable or delete existing ones.
Understanding and Configuring Conditional Actions
The Conditional Actions module is a core component of Ubercart. It is essential for configuring shipping costs and tax rules. Additionally, it is used to automatically update the order status upon payment receipt and to send automatic notifications.
Shipping quote settings overview
To manage shipping settings, go to Admin | Store Administration | Configuration | Shipping quote settings. This page contains three tabs:
Overview: This first tab provides a brief summary of the available shipping methods.
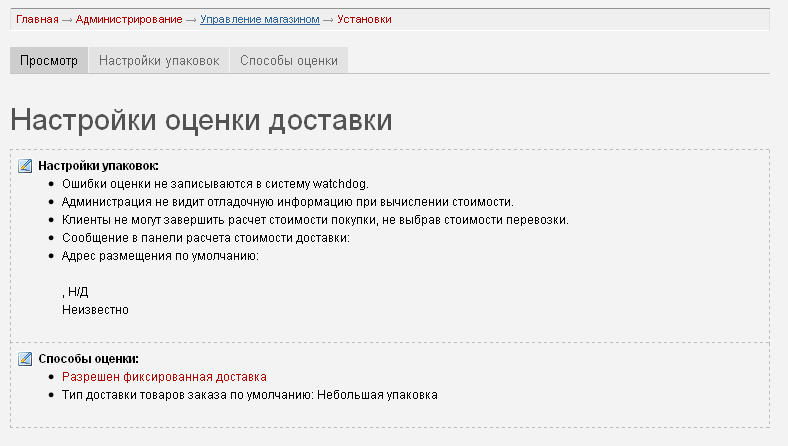
Packaging settings: This page offers several options.
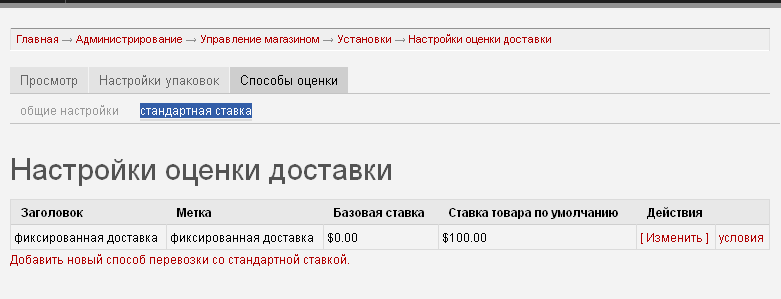
Flat rate shipping
Click on the Flat rate tab (Standard rate — translations may vary and often need to be done manually). If there are no flat rates, it means none have been created yet. Let's create a standard shipping method: $10 per order and $1 per item. We’ll also create free shipping for orders over $250.
Setting up taxes and payment systems
We’ve reached the point where we can start selling our products and accepting payments. This is a key feature of our online store — one that is essential for successfully launching our business and enabling us to accept direct payments from our web customers.
Tax settings are important if you are selling products that include VAT.
Payment systems in Russia
Shopping without queues, 24 hours a day, all from the comfort of your computer — thanks to the convenience of electronic payments, digital money is becoming increasingly popular. In real time, it can be used to pay for nearly any goods and services: from online games to university tuition. “Time to Live” explains how it works.
How to open an Online Store on Drupal
 Companies classified as small businesses usually cannot afford to invest as heavily in expanding their sales geography as large manufacturers can. An alternative is to embrace e-commerce — selling products directly to consumers via the Internet. “Time to Live” explores the principles of building a successful online store.